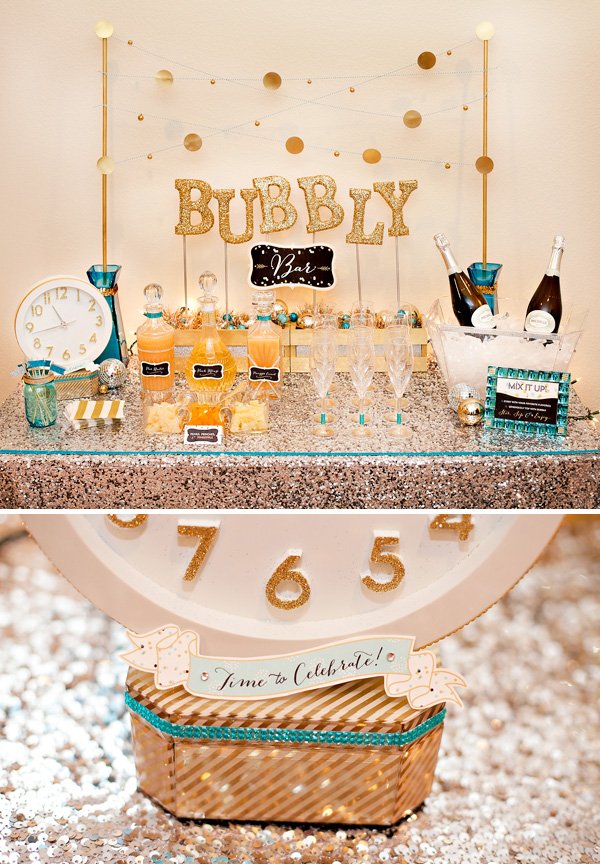
Sweet & Sparkly Bubbly Bar {New Year’s Eve & Beyond!}

When I think of New Year’s Eve celebrations, images of sparkle, fun, and all-around excitement immediately dance in my head. So when Michelle Sparkling Wines asked me to dream up a NYE Inspired Bubbly Station for them, those are the exact qualities I wanted to infuse into the design!
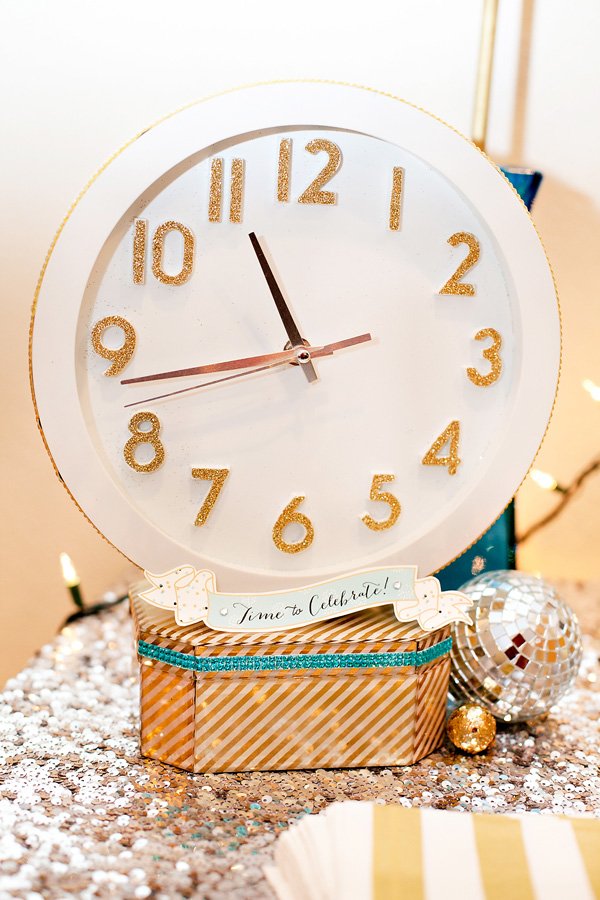
Armed with craft supplies, a few holiday accents, and a whole LOT of glitter, I set out to create a drink station that felt like a party all on its own. The goal was a look that was stylish, glam, and anything but stuffy. I also wanted the bubbly station to hint at a New Year’s Eve theme, but also provide usable inspiration for other occasions, like winter wonderland parties and seasonal bridal showers (wouldn’t this same look be cute with pink accents & Brut Rosé?!), so the DIY clock element features a versatile “TIME to celebrate!” message instead of the traditional “countdown” verbiage that you typically see.
I hope you like how this bubbly station turned out, because you’ll find all the how-to details below, in case you want to bring something similar to life at your own celebration… whether it’s just an idea or two, or the whole sparkly shebang! P.S. There are some free printables awaiting you below too. Enjoy! :)
SPECIAL DETAILS to look out for:
- DIY Clock accent with sparkly numbers + printable “time to celebrate” banners
- Flag drink stirrers made from glittery ribbon + blinged-out champagne flutes
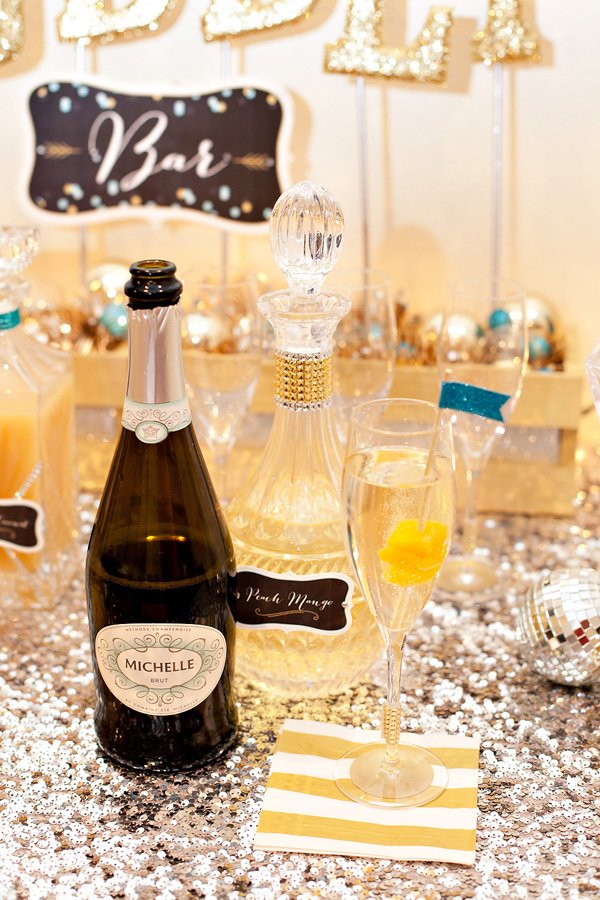
- Crystal decanters decked out with craft rhinestones & printable labels
- Free-standing “mini backdrop” reminiscent of floating bubbles


Sweet & Sparkly Bubbly Station – The Creative Details
***
THE INSPIRATION BOARD:
For any detailed styling project or event, I pretty much always start by designing an inspiration board in Photoshop. It helps me visualize the big picture and focus my thoughts. Here’s the board I came up with for this one:

P.S. We actually did the cotton candy stir stick thing pictured above too…. more on that coming up in a separate post! ;)
‘BUBBLY’ CENTERPIECE
The centerpiece took a little time to put together, but I really wanted it to make a big splash, and the extra effort was worth it. The steps aren’t difficult by any means, but they can get a little messy, which is pretty much always the case when it comes to glitter.
I started by covering the wooden letters, dowel rods, and crates with metallic gold and silver spray paint. Once dry, I filled the crates with craft foam and used silver wrapping paper to cover the front gaps in the crate where the foam showed through. Next up: glittering the letters. I always use spray adhesive then dump the glitter over them. It’s messy but fast – and fast is always a bonus for me. Then one coat of clear sealant + hot gluing the letters to the dowel rods. I slightly angled the letters to give them a more playful feel.
Last but not least was the easy part: inserting the rods into the foam-filled crates and using a holiday tinsel garland to cover up the foam. I also tossed in some sparkly sytrofoam craft balls and ball ornaments to help play up the “bubble” effect.
MINI BACKDROP
This free-standing idea was so cost effective & easy! I found the pretty aqua vases at HomeGoods for $6 each, then filled each one with rice and a gold-painted dowel rod. After positioning them on the table, I criss-crossed baker’s twine between them at random angles, then attached gold paper circles and more of the mini styrofoam craft balls to the twine to play up the idea of “floating bubbles.”
CHAMPAGNE FLUTES
I always love dressing up glasses, but was especially thrilled with how these turned out because they were so quick to do! Rhinestone sticky strips are my favorite method of embellishing lately… they are around $2.50 at Michael’s for a 2×12″ strip. All I did here was cut the strips into squares, remove the backing, and apply the sparkly squares to the stem of each glass. Voila — blingy flutes! For the finishing touch, I used a glue dot to apply the same gold paper circles from the centerpiece to the base of each glass.
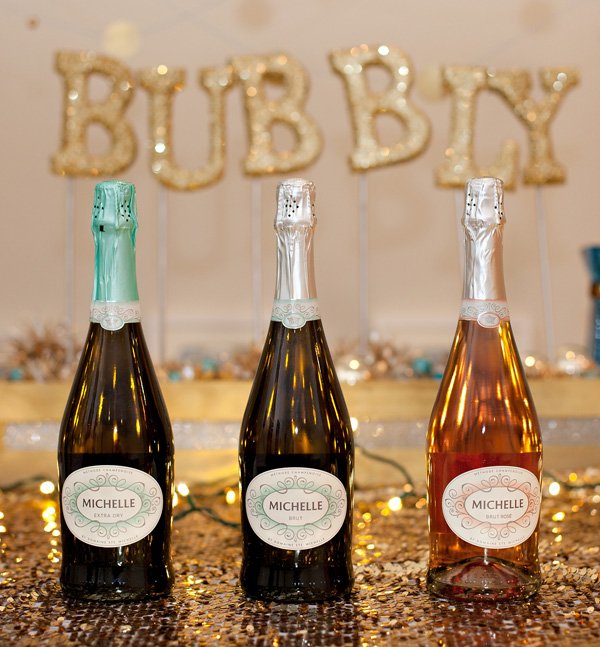
THE BUBBLY
Thanks again to Michelle Sparkling Wines for making this shoot possible! The color palette was inspired by their signature Brut, which is made in the Méthode Champenoise style. This sparkling wine has been around for a long time under the name Domaine St. Michelle, but recently underwent a rebrand, where they freshened up their look and shortened the name to just “Michelle.” They offer Brut, Extra Dry, and Brut Rosé.
MIXERS & GARNISHES
For the mixers, I wanted to stick with colors that matched the palette and were also a little unexpected, so my choices were Pear Nectar, Peach-Mango, and Pineapple-Coconut (all available at my local grocery store). Complimentary fruit garnishes included peaches, pears, and pineapple.
I found the crystal decanters on Amazon, and they were much more affordable than what I was seeing in most stores. (Find them here, here, and here.) I used more of the rhinestone sticky strips to give them extra bling and designed some labels for the front of each bottle. I was really happy with the way they turned out… they might just be my favorite part! :)
I also made a quick drink sign instructing guests to pick their favorite mixer flavor(s) to add to their bubbly. You can download this same sign below.
ACCENT DECOR
The one place I knew I wanted to splurge was the linen. La Tavola’s sequin-bedecked New York Linens are one of my favorite party elements ever, and I just couldn’t resist including them here. Ball ornaments, disco balls, a blue mason jar filled with DIY stir sticks, and white string lights also added an element of fun.
I also bought a simple, inexpensive wall clock at Target (for $7), removed the glass face, and “glittered” the numbers by painting them with glue then dusting on glitter. More of the fabulous rhinestone sticky strips were used to embellish the outer rim of the clock, and I whipped up some little “time to celebrate” banners to add to the front. This would work great as a New Year’s Eve dinner table centerpiece as well!
FREE PRINTABLES
Click here to download the paper details used in this station, including the “Bar” sign, flavor labels, 4×6 drink sign, and “time to celebrate!” banners. ENJOY! :)

- Styling, Printables, and Photography: Hostess with the Mostess
- Sponsor: Michelle Sparkling Wines
- Sequin Linen: La Tavola (New York Silver)
32 Comments
Comments are closed.


Sweet & Sparkly Bubbly Bar {New Year’s Eve & Beyond!} http://t.co/JKr0Zlbi56 #weddings
Sweet & Sparkly Bubbly Bar {New Year’s Eve & Beyond!} http://t.co/mpuqysFRU5 #weddings
This bubbly bar station from HWTM is so very stylish and Fabulous. Check it out to find out all the how to details https://www.hwtm.com/2013/12/champage-bubble-bar-ideas-new-years-eve/
I am in love with this! The color palette is so pretty!
This is adorable! I love it!
agirlandhersparkles.blogspot.com
Gorgeous! <3 it!
Love that sequin tablecloth- Sweet & Sparkly Bubbly Bar {New Year’s Eve & Beyond!} https://www.hwtm.com/2013/12/champage-bubble-bar-ideas-new-years-eve/ via @hwtm_jenn
What mixers did you use? I couldn't find them at Kroger :/
Love this, Jenn! The clock is so adorable!!! And, the floating circles for the backdrop is such a cute way to bring in the bubbly inspiration!!
oh my wow…simply divine. The clock, the glitter “Bubbly”, the sequin tablecloth…simply gorgeous!!
Love this for a New Year’s Eve party!
Wonderful, Every thing is looking so awesome.