Cute Paper Pumpkin Favor Boxes – DIY Tutorial

Stacie Keiffer of Fancy & Fold is here with a super cute seasonal DIY for us today! You might recognize these adorable Paper Pumpkin Favor Boxes from the Rustic Little Pumpkin Baby Shower featured earlier today. Read on for the details on how to make them yourself (as told by Stacie)!

PAPER PUMPKIN FAVOR BOXES TUTORIAL
This cute little Pumpkin Box is the perfect Fall party favor! Fill with treats for Halloween, Thanksgiving or a Pumpkin Baby Shower/Birthday.
To start, gather all that you will need to construct the box.

You’ll need:
- 1 piece each of orange and green 8 ½ x 11 cardstock
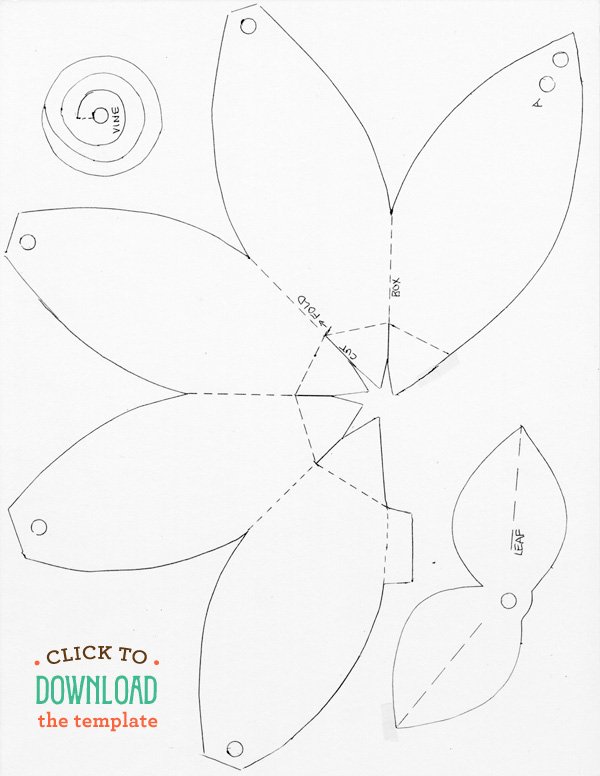
- paper pumpkin box template (see below)*
- a 7” piece of 3/8 “ brown grosgrain ribbon
- pencil
- clear tape
- scissors
*Note: you can also use a silhouette machine in place of the hand-cut template if you happen to own the machine
Instructions:
1. Open the template file and print directly onto the orange and green paper. You will only need to do this once so that you understand the process.
For the rest of your pumpkins you can cut out the template and trace onto the paper of your choice. You can also enlarge the template and cut out of 12” x 12” scrapbook paper to make a larger box.
2. Cut out your templates, fold on dotted lines (keeping the directions and lines up, facing you) and punch the 6 holes.
3. For side A (which you’ll find in the upper right corner of the template), you will need the ribbon. Pull one end of the ribbon through one hole about half way. Pull the remaining end of the ribbon through the other hole and tie a knot (as shown below). Tape down knot and leave at least 3 inches for the stem.

4. Pull the two ends of the ribbon sides together and tape down the tab on the inside of the box.
5. All 5 bottom points will pull together, making the bottom of the pumpkin. Place a piece of tape on the inside of the bottom to hold in place.
6. If adding treats, this is the time to put them inside the box. If your treats are loose items, put them in a small clear craft plastic bag or baggie.
7. Carefully (going left to right) pull the stem/ribbon through each hole.
8. Cut out the leaves and vine from green paper. Fold on dotted line for leaves. Cut around the spiral cut line of the vine. Pull stem/ribbon through the vine’s hole and pull the pointed end of the vine to make it “spring” out.

10. Finally, pull the brown stem through the leaves. Done!
Added:
- Thanks again to Stacie for sharing this fun DIY with us! Be sure to check out more of her work at Fancy & Fold.
6 Comments
Comments are closed.


DIY Tutorial: Paper Pumpkin Favor Boxes #catering #wedding http://t.co/6V0TJJLplh
DIY Tutorial: Paper Pumpkin Favor Boxes http://t.co/iHE1FLCelZ
DIY Tutorial: Paper Pumpkin Favor Boxes https://www.hwtm.com/2014/10/diy-tutorial-paper-pumpkin-favor-boxes/ via @hwtm_jenn
So great. THANKS
Cannot download your template
Hi Bonnie – I just checked the download link and it worked on this end… so I’m not sure what’s going on, but here’s the full URL if you just want to try copy pasting it: https://www.hwtm.com/wp-content/uploads/2014/10/paper-pumpkin-box-template.pdf
Hope that helps! :)