DIY Floral Bunny Ears & Tail

Here’s a creative way to make your own floral bunny ears… to perfectly match that Easter dress, bunny party outfit, or just for some crafty Easter fun! 😍
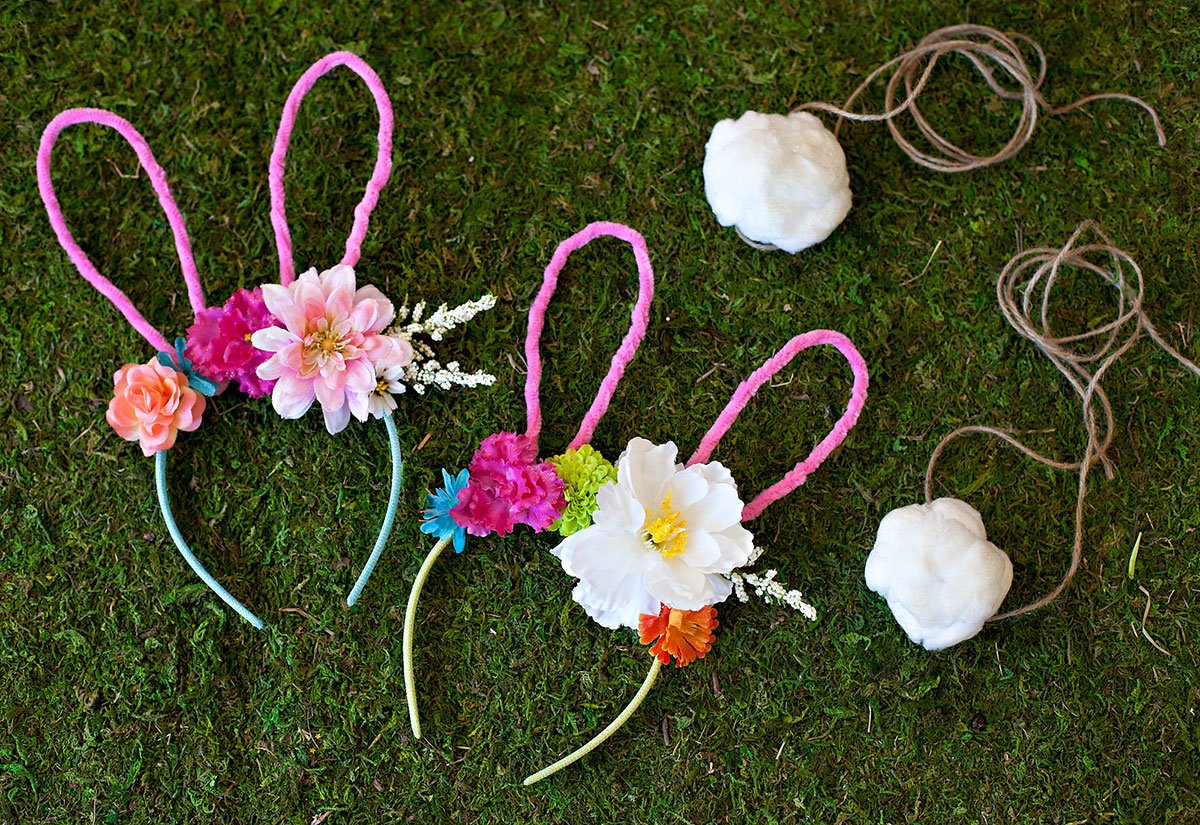
One of my favorite things about this project is that you can totally customize the look with your favorite colors, flower styles, etc.
Party Station Activity
These headbands are also a great activity station idea for older kids (just be careful with the hot glue), and even adults with a playful side! 😉
Set out a bunch of artificial blooms and let everyone make ears that match their personal style. Then take a bunch of cute pics, of course!


FLORAL BUNNY EARS HEADBAND
***
Materials:
- 6 Pipe Cleaners (in color of choice)
- Headband
- Faux Flowers
- Scissors
- Hot Glue Gun
- Spray Glitter (optional)
Steps:
1. Stagger 2 pipe cleaners together into one line, with a couple of inches overlapping. Twist them together where they overlap. This will form one extra-long pipe cleaner.
2. Cut a 3rd pipe cleaner in half. Twist one half onto each end of the *long pipe cleaner* you made in step 1 so that the overall thickness of the final piece is consistent from top to bottom.
3. Bend the finished pipe cleaner into a loop to form the ear, and twist the bottom ends together.
4. Repeat the above process to make the 2nd ear.
5. Attach both ears to a headband by wrapping the twisted bottom ends around the headband and securing them with hot glue.
6. Hot glue flowers to the headband.
7. Spray with gold glitter for a sparkly finish. (optional)
COTTON BALL BUNNY TAIL
***
Materials:
- Jumbo Cotton Balls
- Gold Glitter spray
- Stiff White Felt
- Twine
- Scissors
- Hot Glue Gun
Steps:
1. Take 6 cotton balls and gently “pull” at them to open them up a bit and make them bigger.
2. Smush all 6 cotton ball pieces together into a ball with your hands. Shape them into one large “cottontail”.
3. Spray the cottontail with gold glitter and let dry. (This will also help to hold the shape.)
4. Trace and cut (two) 2-inch circles from white felt. (They don’t have to be perfect circles.)
5. Hot glue the cottontail to the first felt circle.
6. Secure any large open gaps in the tail itself with hot glue.
7. Hot glue a piece of twine to the back of the felt circle.
8. Hot glue the remaining felt circle on top of the twine. (The goal is to “sandwich” the twine inside the 2 pieces of felt).
Done! When ready to wear, use the twine to tie the cottontails around the kids’ waists. Have fun! 🐰🥳

Easter Chic Printable Collection
P.S. Planning an Easter party? Check out our Easter Chic printables! They make it EASY to add tons of designer style and personalization to your party. 🙌 You can even customize the text yourself, as often as you want. Click here to shop this collection. (Also available in a birthday party version.)


