Fun Holiday Treat: Candy Cane Cake Pops

I’ve been wanting to try my hand at cake pops ever since first stumbling upon Bakerella back in February of 2008, but it just never happened. To be honest, I think I was a little scared of how mine would actually turn out. Well, cross this one off the bucket list because it’s finally done!
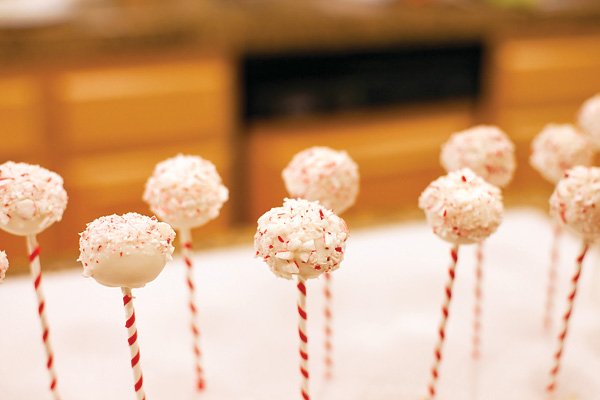
And yes… I purposefully started with a simple design that promised to be, um… “forgiving” if my melted candy coating didn’t turn out quite so smooth and beautiful as Bakerella‘s. What better way to disguise lumpy cake balls than with a coating of crushed candy canes, right?!

Well, the white candy melts turned out to be extremely cooperative (hooray!), so I was even able to create a 2nd “smooth” design, replacing the crushed candy canes with little accents of bright red candy melt stripes instead. (You still get the “candy cane” flavor on the 2nd design if you add peppermint extract to the cake batter.) And the “candy cane sticks“? They’re just regular white lollipop sticks wrapped with red ribbon!
Ready to try these yourself? Good, because they don’t just look cute – they’re seriously TASTY too! Instructional pictures + full recipe below…

FOR THE CAKE POPS:
Bake cake according to box instructions.
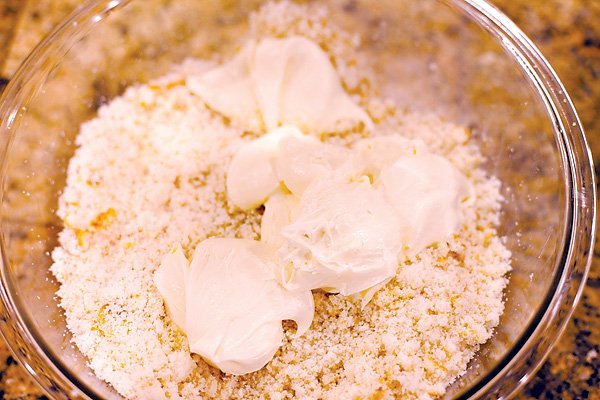
1. Add 1/2 tsp peppermint extract to the batter (optional). Let cake cool completely, then crumble it into a large bowl.

2. Mix in almost an entire can of frosting (about 4/5 of a can).
3. I started off using a large wooden spoon to mix the cake and frosting together, then switched to my hands, as Bakerella suggested. Using your hands gets the job done so much quicker – but be warned that it’s MESSY!
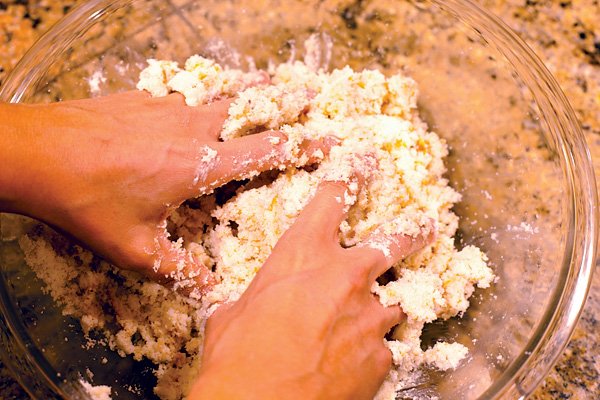
4. Roll the cake-frosting mixture into quarter size balls and place on a wax paper-lined cookie sheet or another flat dish that will fit into your refrigerator or freezer. The batter should make between 45-50 balls.

Note: The batter is very sticky and tends to stay to your hands when you’re rolling the balls. I did a quick rinse & dry on my hands several times during the rolling process because I found that the cake balls rolled out much smoother when my hands were batter-free and slightly damp, as water helps to keep the batter from sticking.
5. Chill in the fridge for several hours. If you’re in a hurry, use in the freezer instead. You just want to get them firm enough to hold their shape during the warm-candy-dipping process.
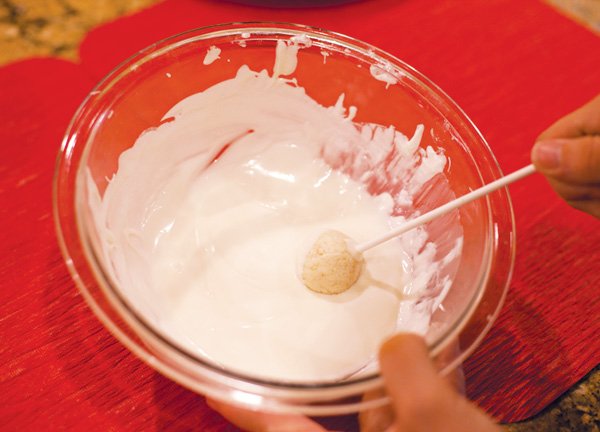
6. When you’re ready to coat the cake balls, melt white candy melts (similar to white chocolate) as per instructions on the bag. I melted an entire bag in 1-minute intervals at 50% power twice (mixing in between each interval) then at 30 second intervals until the consistency was nice and smooth.

7. Dip just the tip of your lollipop stick in a little bit of the melted candy and insert them into the cake balls, a little less than half way.

8. Place the pops back in the freezer for a bit to firm up (which happens pretty quickly).
9. Once firm, carefully dip the entire cake ball into the candy coating and rotate until the cake ball is fully covered.
10. Rotate and softly tap the covered cake pop to help the excess chocolate drip off.

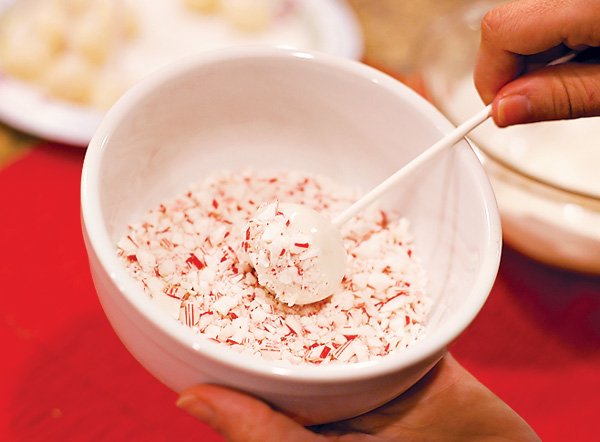
11. While the coating is still wet, roll the cake ball in a bowl of crushed candy canes. Cover just half-way or completely – whichever you prefer. (Skip this step for the “smooth” design.)
12. Insert the sticks into a sheet or block of styrofoam to dry. (Note: the following pic was taken after I also decorated the sticks.)
FOR THE CANDY CANE STICKS:
- 6″ Lollipop sticks + thin red ribbon = Candy Cane Sticks. Easy! Just wrap the ribbon diagonally and secure both ends with the tiniest dab of hot glue (watch the fingers!). You can also use clear-drying tacky glue. This might sound like a lot of work but it goes surprisingly quick and gives you nice bonus points for presentation!
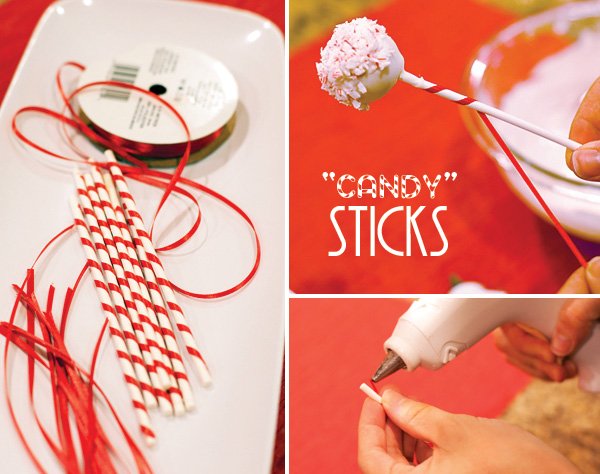
You can decorate the sticks before or after you make the cake pops. I started off decorating them before, got distracted by something else, then forgot about the sticks and went straight into the dipping process, so most of my sticks were decorated after. It worked out fine though!
For a cute dessert table display, cover the styrofoam with fake snow!

PEPPERMINT CANDY CANE CAKE BALLS
{inspired by Bakerella‘s cake pops}
You’ll need:
- 1 box white cake mix (baked as directed on box)
- 1 can vanilla frosting
- 1/2 tsp peppermint extract
- White Candy Melts – 2 bags
- Candy Canes, crushed
- Red Candy Melts – 1 bag (optional, used only for design #2)
- Styrofoam – sheet or blocks
- 6″ white Lollipop Sticks
- Red Ribbon
- Hot Glue (or clear-drying tacky glue)
Instructions:
Here are Bakerella’s original cake pop instructions, (with my addition of crushed candy canes on step #8):
1. After cake is cooked and cooled completely, crumble into large bowl.
2. Mix thoroughly with 1 can frosting. (I use the back of a large spoon, but it may be easier to use fingers to mix together. But, be warned, it will get messy. Also, you may not need the entire can of frosting, so start out by using almost the entire can and add more if you need to.)
3. Roll mixture into quarter size balls and place on wax paper covered cookie sheet. (Should make 45-50)
4. Melt chocolate in the microwave per directions on package. (30 sec intervals, stirring in between.)
5. Dip the tip of your lollipop stick in a little of the melted candy coating and insert into the cake balls. (Insert a little less than halfway.)
6. Place them in the freezer for a little while to firm up.
7. Once firm, carefully insert the cake ball into the candy coating by holding the lollipop stick and rotating until covered. Once covered remove and softly tap and rotate until the excess chocolate falls off. Don’t tap too hard or the cake ball will fall off, too.
8. While still wet, roll cake pops in crushed candy canes (for design #1)*
9. Place in a styrofoam block to dry.
* For Design #2, (the “smooth” design) let dipped cake pops dry, then add a few red Candy Melt stripes on top. Using a zip-loc bag with a tiny piece of one corner snipped off, drizzle the melted red candy back and forth across the top of each cake pop.

These are awesome for holiday dessert tables or party favors… and if you’re short on time, you can skip the sticks altogether and just make candy cane cake balls. They’ll still look pretty darn cute – just like little cake truffles!
44 Comments
Comments are closed.


WOW! For a first try, I would say you have it mastered! I love the idea of the crushed candy canes. Great Job.
Thanks, Mary! :)
You know what would be even better?Buya delicious cheesecake from a great bakery,use a scoop to make small balls out of the ceesecake,freeze,and coat with candy like you did above!Just a variation!Thanks for the recipe!
First try?! But these are SO adorable! I’m so embarrassed to have posted my little amateur ones now – after these photos and all the gorgeous Bakerella ones, “amateur” is not a strong enough word for mine – they could have been made by a 5-yr. old! And, if anyone asks, let’s just say there were… ;) Love this blog and absolutely everything posted on it btw. You are such an inspiration!
Thanks for the sweet comment :) And I’m sure you’re being overly hard on yourself about the cake pops!
Great job! To help with the messy hands, I scoop all my cake with a mini ice cream scoop and put in the freezer for a few minutes before rolling into nice smooth balls – seems to help a lot!
Great tip, Rene – thanks!
Thanks for sharing this delicious and festive recipe!
for christmas eve i am to bring a dessert…i totally know what i’m doing now!! thanks!! and they look amazing BTW!
These are adorable. The striped sticks are the clincher for me! Love them. I shared these with my FB fans. Thanks so much!
You did a beautiful job! I am so impressed w the extra touch of ribbon on the sticks! LOVE IT! Details, details – you always know just how to take it over the top!
XO
They look so Yummy! There’s nothing better than the combination of chocolate and peppermint. I especially love how you decorated the stick. Great detail!
So cute, and very crafty!
Thanks for the great directions. I have made these before but it seemed like too much frosting. I like your idea of not using the whole container of frosting. I think that would make the difference. I am planing on trying them again, making them the way you did.
If you want to serve them as bon bons (without the stick) or upside-down (stick side up) here’s an idea: Place whole peppermint candies – the round kind – on parchment paper on a baking sheet and bake for a few minutes at 350 degrees. They will melt and flatten out a little. Then place the bon bon or upside-down pop on the peppermint candy base.
These are fabulous and I was so inpsired by the idea…my three girls and I spent yesterday making a huge batch of them for a Christmas party. They were spectactular and delicious! The recipe worked great using less than a full tub of frosting. The only snafus we had were putting too much melted chocolate on and then having the crushed candy drip off (solution: spin the dipped pop in the bowl a few times to get the extra off before adding the candy cane). And letting the pops unfreeze too much before adding the melted chocolate caused the stick to loosen and pop to fall off in the bowl (darn, we had to eat those!). I’ll try to post the results on our Facebook page.
Best Instructions EVER! And wickedly amazing job! Love the details of the snow and the ribbon. Totally stealing for this weekend! :)
Thanks for sharing. Gonna bookmark this one.
I might attempt to make these to bring home for the holidays..they look awesome!
These are so stinking cute! Definitely will be making these this holiday season! Love peppermint flavor and the look…SO CREATIVE with these particular cake pops! I must admit I ran out and bought Bakerella’s book as soon as it came out and have been making Bakerella’s cake pops for every holiday/party I can think of since!!! I love any excuse to make these and I’ve found that using about half a can of frosting for the entire 13×9 cake works best. 1) It helps your balls keep their shape 2) It pretty much eliminates the sticky problem you had when rolling the balls… 3) Since the balls keep their shape better you don’t have to freeze/refrigerate for as long.
Anyways, just a friendly suggestion :) Happy Holidays!
Wow! So yummy! The kids will totally love this!
Looks so yummy and perfect Jenn!
Wow those look amazing! I made some for Halloween but I didn’t melt the candy right and they were all lumpy but delicious nonetheless! Thanks for the melting tip. I’ll have to try again for Christmas Eve Party :)
OMG – These are so stinking cute – I love love love the lollipop sticks too, what a great idea :)
I just wanted you ot know that I linked this page to my blog! thanks
Wow – these look absolutely delicious! I cant wait to try these – if you are looking for labels for these, check out https://www.labelsonthefly.com/
I love these and they seem simple enough – any thoughts though if I make my cakes from scratch & use butter cream icing…not trying to be a snob – but I must admit – I make a wonderful cake.
We really love the Candy Cane Pops and were compelled to feature you on our blog in the We’re Diggin’ series! Thanks for making it so easy to fall in love with your handmade goodies!Check it out at- http://kocoandviking.blogspot.com/2010/12/were-diggin-candy-cane-stripes.htmlKeep up the amazing work!xoxo koco & viking kocoandviking.blogspot.com
Hello,
I was wondering if you can tell me once made, how long they will stay fresh for and how I would store them?
I want to fly interstate and share with loved one’s over this coming christmas.
I look forward to hearing from you
Kind regards,
Hannah
Hi there!
ure brilliant,love ur work Jennifer..i need some advice from a master like u, i live in Indonesia,here we dont have candy canes and candy melts,so is it okay if i just use a cooking chocolate instead? thx a bunch.. :)
Yes – that should be fine. I’d recommend white chocolate for these :)
wondering how many this recipe makes?? Thought I might do this for a cookie exchange! Please email me with the answer! Thanks
Hi Judy – These make between 45 – 50 cake pops, depending on how big you make them :)
How far in advance can you make these?
where did u use the extract?
o i’m sorry just read it in the beginning.
:]
These cake pops were awesome I am 11 years old and I made them for Christmas for my family and they all loved them and I switched out the vanilla cake for dark chocolate and same with the frosting in the balls! LOVE the recipe.
Thanks
WOW, WOW BEAUTIFUL CAKE BALLS.
Love these!
Love These! <3 <3 <3 Thank You! *Mary*
someone at a church function made these oh man I had to find the recipe so I am going to give it a whirl, sounds simple enough and soo delicious!
muy lindo,
Do we use 1/4 tsp of peppermint extract or 1/2 tsp in the cake?
Should be 1/2 a tsp – the “1/4” was a typo. Sorry about that & thanks for the catch! :)