Retro Rainbow Baby Shower {Part 1 – Table & Decor}

Everything’s coming up sunshine and rainbows today! 😎🌈
This Retro Rainbow Baby Shower is a fun mix of glitter, rainbows, and throwback-inspired elements like retro candy, color blocked gold chargers and DIY disco baby roller skates embellished with sequins! (Which quickly become one of my favorite DIY projects EVER!) 🥰
If you like what you see below, head over to Part 2 of this theme next to check out the matching dessert table & treats.

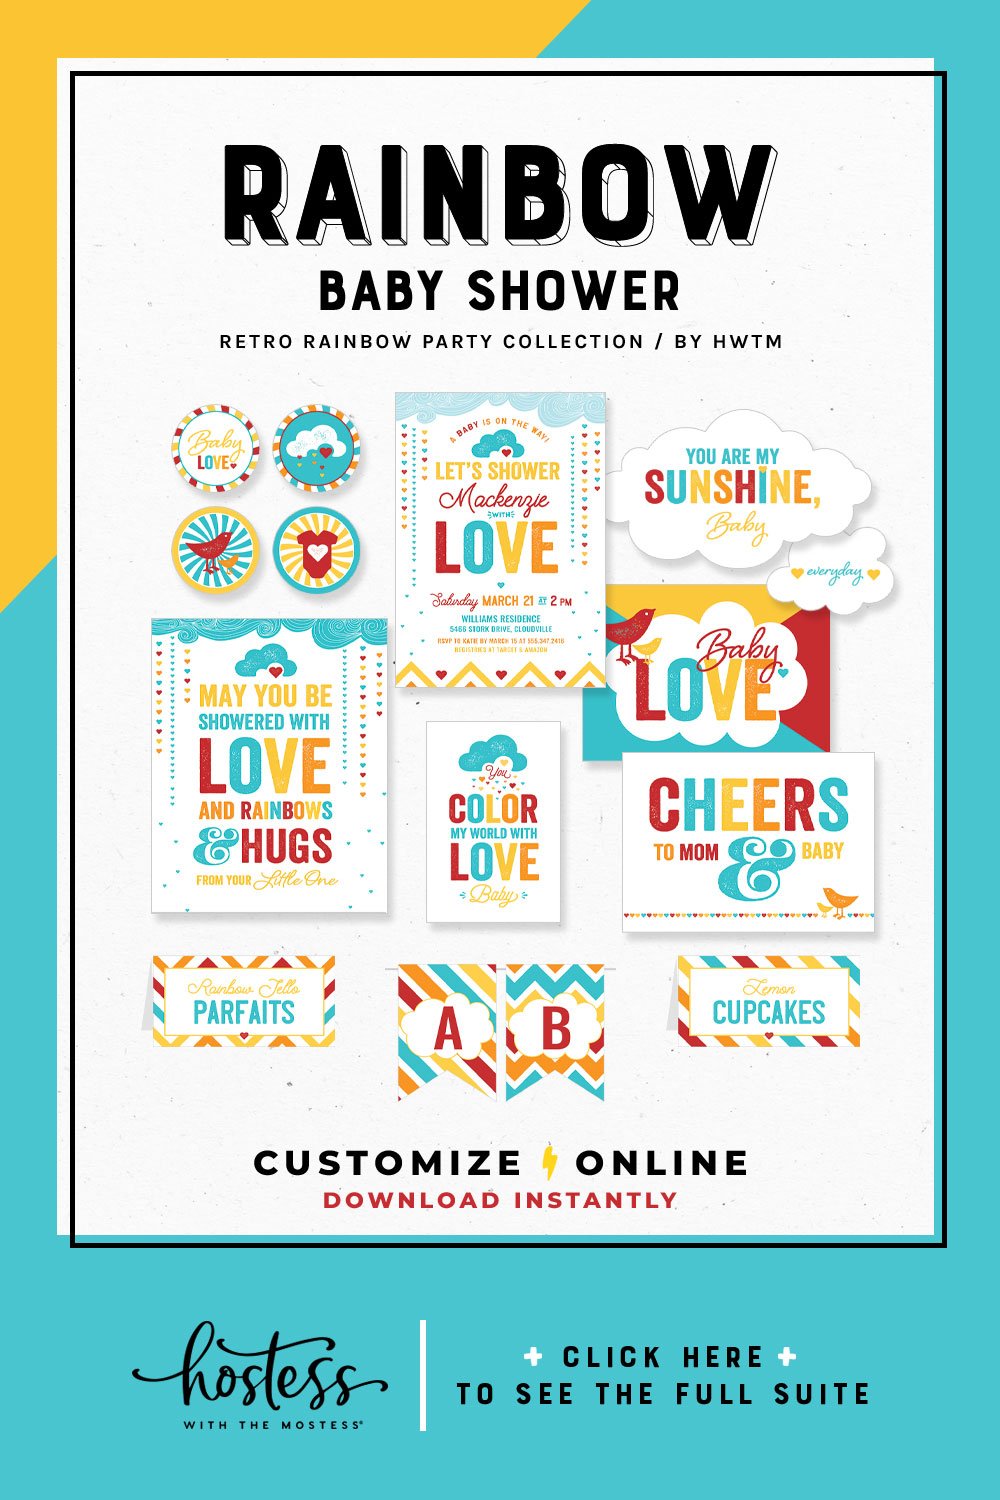
Rainbow Baby Shower Printables
My Retro Rainbow printables are available in our store! Use them to add instant style and personalized details to your party. 🙌 You can edit the custom text yourself – right on the website – whenever (and as often as) you need to! Click here to buy this collection.

PARTY HIGHLIGHTS TO LOOK OUT FOR:
- Quilt-batting “cloud” centerpiece + rainbow button “rain drops”
- A (super easy) alternate centerpiece idea made from printable paper clouds
- Color-blocked chargers and glasses (made with painter’s tape & spray paint)
- Party Favors: Retro candy packaged in mini glittered baby bottles with printable flags
- Chair backs decorated with ribbon & glittery hearts (+ a cloud for mom-to-be’s chair!)


PARTY DETAILS:
I wanted the vibe of this Retro Rainbow Baby Shower to be playful and happy… something that would put both mom-to-be and her guests in a “shiny happy” mood the minute they arrived! Bright colors, metallic gold, glitter and fluffy white clouds took center stage. The printable paper details played a huge part in bringing this theme to life – through elements like framed prints, party flags, and bold patterned papers used as napkin rings and dessert tray liners.
I hope this theme makes you happy too! If you know a mom-to-be that would love to be showered with sunshine and rainbows, the entire printable collection (+ coordinating items) can be found right here.
TABLETOP DETAILS:
Centerpiece Design A:
- “Bubble” vase (from HomeGoods) spray painted gold & decorated with large candy dots
- DIY clouds made from quilt batting and felt
- “Raindrop” button strands made from buttons, fishing line, and mini glue dots
- Smaller bud vase (from Ikea) spray painted gold & white
- Framed prints, glittered pacifiers, & extra quilt batting around the base
Centerpiece design B:
- Printable “You Are My Sunshine, Baby” paper clouds attached to wooden dowels
- Dowels inserted into foam filled vase & covered with quilt batting
- Glittered acrylic pacifiers around the base
Place Settings:
- Color blocked acrylic charger plates
- “Double dipped” (Dollar Tree glasses spray painted with white and gold)
- Utensils adorned with glittered mini wooden hearts
- Retro Orange Cream Soda Bottles + stripey straws embellished buttons
- Patterned paper “napkin rings”
- A special glittered initial used to distinguish mom-to-be’s place setting
Etc:
- Inexpensive sheet from Target used as “table cloth”
- Chairs decorated with bands of ribbon + glittered hearts
- Mom-to-be’s chair had a special cloud + glittered heart chair back design!
PARTY DECOR DETAILS:
- Wooden shadow boxes (from Michaels) painted two-tone with craft paint
- Wooden letters (from Michaels) spelling BABY painted two-tone with craft paint
- Vases decorated with large Candy Buttons
- Glittered acrylic pacifiers
- Framed Prints embellished with buttons and glittered hearts
- Onesies embellished with ribbon, buttons, glittered hearts, & printable paper details
DIAPER CAKE:
This diaper cake was super easy! Two wooden shadow boxes painted two-tone with craft paint were used for the main “structure” of the diaper cake. The largest box was filled with diapers and then another layer was added around the outside. The smaller box sat on top of the larger one & was filled with more rolled diapers. The cake was decorated with rick rack and sequin ribbon + fabric flowers & buttons.
Diaper Cake Topper:
These “disco baby roller skates” were fashioned from inexpensive baby shoes from Target (I just bought the cheapest ones I could find) + gold spray paint & sequins. Two sets of wooden craft wheels were also spray painted gold and embellished with buttons, then hot glued to the bottom of the shoes. For the finishing touch – a little printable “This is how I Roll” batter was attached to the shoes with wooden dowel!
Retro Rainbow Party Printables
My Retro Rainbow printables are available in our store. They make it so EASY to add pro designer style & personalization to your event. It’s like instant branding for your party! 🙌 Click here to shop now.

- Party Printables: Jenn Sbranti/HWTM (Available Here)
- Design, Styling & Photography: Hostess with the Mostess
- Candy Buttons & Cosmic Rocks used in favors: Candy Warehouse
25 Comments
Comments are closed.


Absolutely love it Jenn! Love the colours mixed up with the gold and the perfect little details that bring it all together. and the printable signage is just awesome too! love love love it x
This has to be one of the cutest baby showers I've seen!
Those clouds with button raindrops are GENIUS! Love this & the printables are FABULOUS!
Complete and total Perfection Jenn!!! I love this theme and the clouds + raindrops are totally amazing. I love love love the diagonal shades of gold and the baby roller skates seriously just blew my mind. Love it.
Everything is so cleverly matched. Wow, so many details. Above all, I loved the sayings which are so good spirited. Congratulations. I was totally inspired by these and I will check the shop.
This is so cheerful and such a unique twist on the theme. I love all the handmade details!
Love the colors …. it’s darling Jenn! The cloud is GENIUS!
Jenn,
I am loving all the fresh ideas and creative (& couture) touches on all the baby classics! The roller skate has to be my absolute favorite! Thanks for continuing to inspire!
Nicole
Yay! I absolutely loved the sneak peek awhile back and cannot get over all the fab details :) LOVE LOVE LOVE. Seriously amazing.
So adorable! I love the colors, color blocking & glitter!!!
where’d you get the rollerblades???
Hi Susan –
I made the baby rollerskates using inexpensive baby shoes (from Target) and wooden wheels (wood craft aisle at Michaels). Everything was spray painted gold, then embellished with sequins and buttons. :)
You’re so creative! I contacted the lady on etsy so I can purchase the printables, but i asked her if she can change the blue to a purplish color, and add more pink. I feel like this shower looks to boyish? or no?
can you please tell me how to do the cloud centerpiece. i’ve been trying to figure it out but i cant make it stay on the stick for the life of me. PLEASE please help me you would make my month :)
Hi Mayra –
I’m so sorry for not seeing your comment earlier! Also sorry the centerpiece project is being a pain. The thing we did to make the cloud stay up was to actually make 2 separate horizontal “sides” to the cloud and ipece them together, with a backing of sturdy felt and dowel rods hidden inside.
So, for each side of the cloud, the quilt batting was attached to a piece of stiff felt as a “backing” to help hold it together and give it a foundation. Once both sides are done, just glue the dowel rod to one of the backings, then stick the felt-backed sides of each “cloud side” together to form the whole cloud, with the supportive felt backings and the top of the dowel rod hidden inside. You can also just keep the clouds “single sided” and simply use another piece of felt to hide the wooden dowel on the “back”.
Also, I actually also criss-crossed a couple pieces of extra wooden dowel rods on one side of the cloud (and hot glued them there) for further support since I just used felt as my backing, but if you used something sturdier than felt – like chipboard or cardboard, you might be able to skip that step all together. I was kind figuring it out as I went at the time.
Hope that helps and makes sense – this is kind of one of those things that sounds more complicated written out than it felt to put together. ;)
Very creative! I love the colours and all the jars with the lollies.
what size of wooden dowels did u use for the centerpiece?
Hi DSA – I don’t remember the exact size, but I purchased the tall dowels from Michaels (which are sold individually), and believe they are around 36″. The thickness was pretty close to the standard 12″ dowel thickness that comes sold in craft packs – maybe just slightly thicker. Hope that helps a little… I’m sorry I don’t have the exact dimensions for you!
I love it! love it! love it! did i mention i love it!? lol You did an amazing job! I’m interested in making piece with the cloud tag that reads ” you are my sunshine, baby” “you make me happy” “everyday” but using different colors…how do i go about that?
Hey Jenn
Where did you find your pacifiers at?
Hi Samantha –
I just got the 2.5″ acrylic pacifiers that are available in the baby shower section at Michaels (or on Amazon!) – and then we covered them in glitter ourselves using spray adhesive and craft glitter. Hope that helps! :)
You are absolutely amazing …..your creativity is off the charts!!! Love your blog and your work! Fabulous!
Awwww – thanks so much, Ade! I definitely had fun with this project! ;)