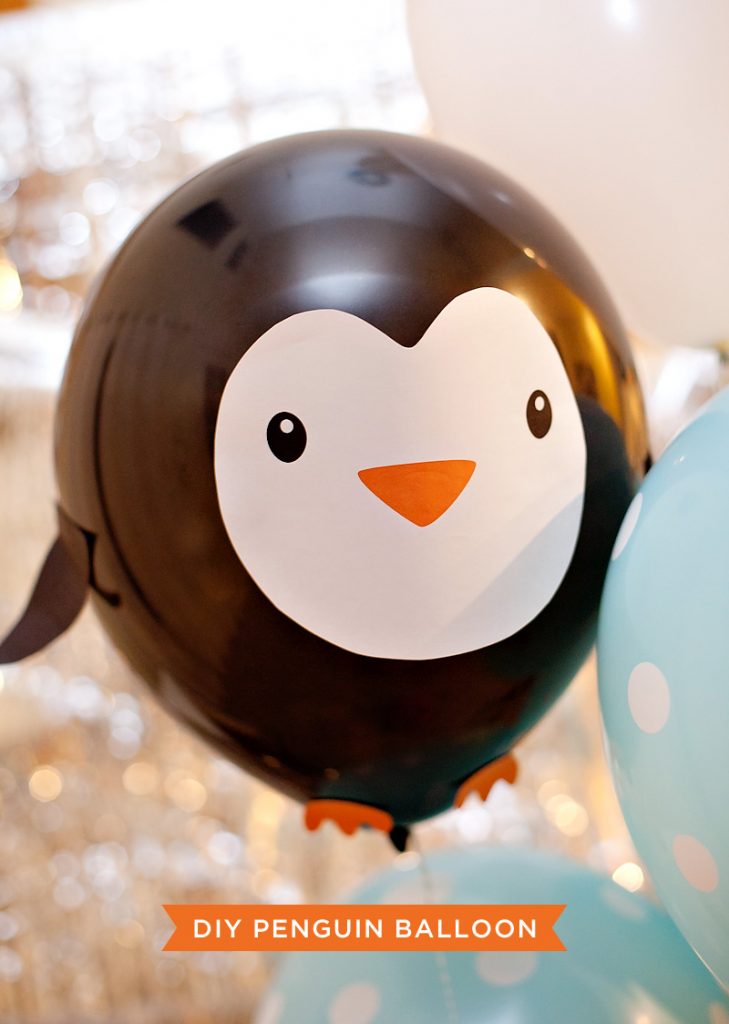
DIY Penguin & Polar Bear Party Balloons

Animals have always been one of my favorite types of party inspirations, but having kids has definitely given me a LOT more excuses to use them!
So… for my very first collaboration with Balloon Time, and given the fact that it’s December right now, I thought it would be fun to dream up some wintery balloon fun for all the pint-sized party animals out there. 😉
These DIY Penguin & Polar Bear Balloons would be such a fun accent for any winter-themed birthday party or playdate, and the added bonus is that they’re super easy too! The animal faces are made from printables, so there’s no need for fancy art skills to recreate them – just cut, tape, and done! 🙌 Read on for full details…

PENGUIN & POLAR BEAR PARTY BALLOONS
***
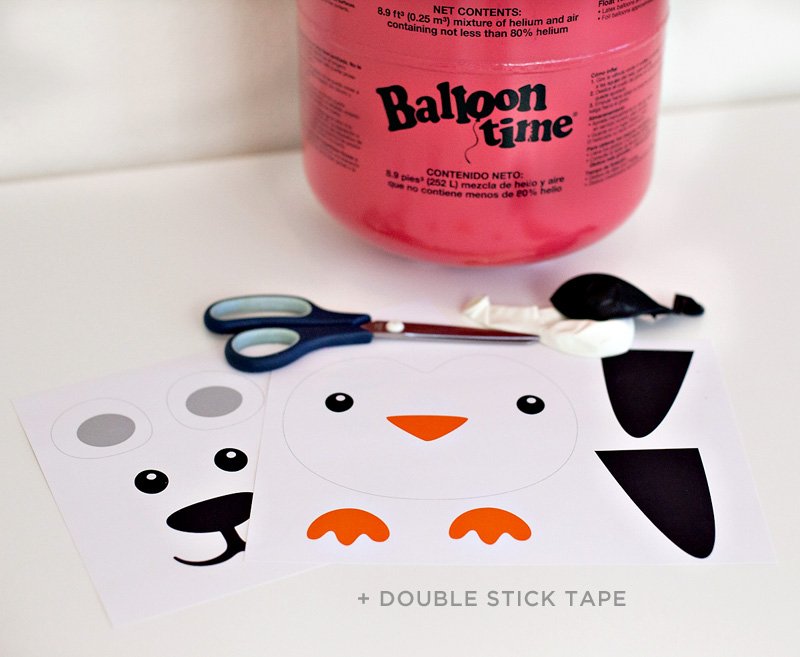
You’ll Need:
- Printable Polar Bear & Penguin Templates
- Black & White Balloons
- Balloon Time Helium Tank
- Double-stick tape
- Scissors
- Baker’s Twine (or other string/ribbon of choice)
Instructions for Penguin:
1. First, print out the Penguin Template. *Please make sure to use lightweight paper for this project.* I tried using a photo quality card stock paper at first, and the paper was too heavy for the balloon so it tipped forwards, then I switched to regular computer paper and it worked great! Live and learn. ;)
2. Next, Cut out the penguin face, flippers, and feet. Tip: When cutting smaller details like the penguin feet, I find it easiest to keep my scissors more stationery and guide the paper along the cut line with my other hand.

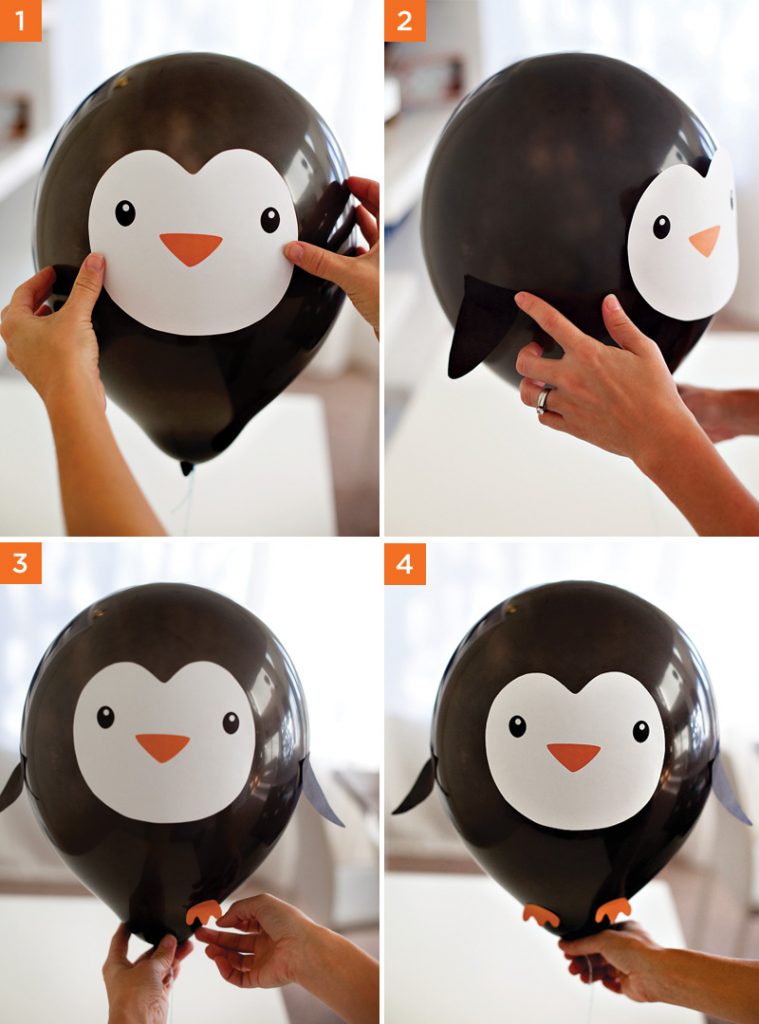
3. Once the paper details are cut, it’s time to blow up your balloon(s). Tie the balloon off & add baker’s twine or your string/ribbon of choice, then tape the string to a table or other work surface so that the balloon stays at your eye level and doesn’t try to float away while you add the face!
Assembly:
1. Put double-stick tape on the back of the penguin face. (I just used two strips total – one on each side.) Stick the face in the center of the balloon. Eyeballing it is fine – don’t worry about being super precise.
2. Add the flippers to each side of the balloon. I just used one strip of double-stick tape at the top of each flipper. Bend them slightly upward to give the penguin more dimension.
3. Add the feet towards the bottom of the balloon, again using double-stick tape and bending them slightly upward to add dimension.
4. Done! Your new penguin balloon is all ready to party.
P.S. It is super hard to photograph shiny black latex balloons without every little thing showing up in them as a reflection, so please forgive the cameo that my home windows and light fixtures and whatever else is making in these pics. ;)

Instructions for the Polar Bear Penguin:
1. Print out the Polar Bear Template, again using lightweight paper as noted in the Penguin Tutorial above. Cut out the ears, eyes, and nose/mouth.
2. Blow up a white balloon and tie it off with baker’s twine or ribbon/string. Tape the twine to your work surface so that the balloon remains at eye level while you add the face.


Assembly:
1. Put double-stick tape on the back of the nose, then place the nose/mouth combo in the center of the balloon horizontally, and just slightly below center vertically.
2. Fold the ears as shown below to create flaps at the bottom, then add a strip of double-stick tape to the flaps.
3. Place the ears on both sides of the balloon, just eyeballing the placement to where you’re happy with it.
4. Use small strips of double-stick tape to add the polar bear eyes. It helps to imagine that you’re forming a triangle upward from the nose.
5. Done! Your polar bear balloon is now ready to party too. Enjoy!

Disclosure: This post is sponsored by Balloon Time. As always, all thoughts and designs are my own. Thank you so much for supporting the companies that make it possible for me to keep the creative content coming your way.
9 Comments
Comments are closed.


DIY Penguin & Polar Bear Party Balloons #catering #wedding https://t.co/e6FSE9X4dh
DIY Penguin & Polar Bear Party Balloons: Hostess with the Mostess®
Animals have always been one of my favorite… https://t.co/Xf3P9W4fKi
DIY Penguin & Polar Bear Party Balloons https://t.co/jRwmbmDJza
Thank you for these! They are perfect easy but impressive decorations for my daughter’s birthday party!
My daughter loves these, especially the polar bear!
Do you think it would work to print out the designs on sticker paper and just stick them on the balloon rather than use double sided tape?
Hi Megan – I think that should work just fine for the polar bear design, but I’m not sure about the penguin since that design piece is much larger, and it can be hard to get a large sticker to lay perfectly flat all the way across on a rounded surface like a balloon. Using double stick tape in just a couple places makes it easy to avoid “bubbles” or creases that can sometimes happen in that situation. No harm in testing it out though! Especially if you’re going to make a bunch of them and need to be extra efficient. If you do test it out, please LMK how it goes. :)
What type of printer did you use to get a glossy image?
Hi Elsa – I used an HP8600 home printer + Staples Photo Supreme Matte Finish paper. Photo paper with a glossy finish will usually get you the glossiest image results though. :)