DIY: Pink Ribbon Tree Centerpiece

In honor of National Breast Cancer Awareness Month, which is right around the corner, we’ve got some new “Pink Party” ideas coming your way!
Maybe you know someone that’s walking in the 3-day & wants to celebrate afterwards, are planning some sort of fundraiser yourself, or want to host a little get together for a very deserving someone. Whatever the reason – this is obviously an important topic that affects the lives of so many people in one way or another, all throughout the year.
So, first up is this Pink Ribbon Tree Centerpiece. This was a really fun piece to put together, and you can definitely tailor this project to other occasions as well! (i.e. silver & white for a Winter Wonderland party, orange and black for Halloween, and so on…)

Read on for all the DIY details…
*****
You’ll Need:
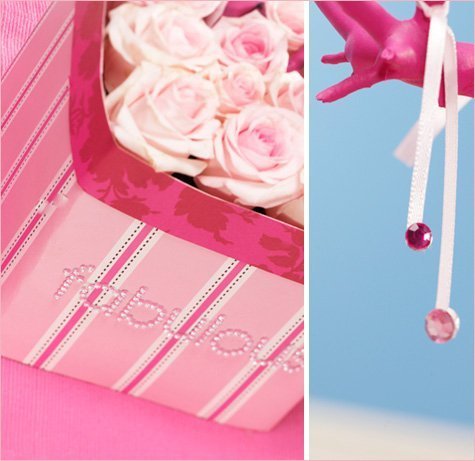
Cube vase (approx 6-7″ wide)
Decorative pink papers in 2 different patterns
Pink Roses (approx 14 – 18)
Floral Foam Wet (2 bricks)
1-2 Manzanita branches (we used one 18″ and one 24″)
Pink spray paint
light pink ribbon (we used 1/8” & 1/4”)
Adhesive-backed pink rhinestones
Rhinestone word sticker (your choice)
Directions:
1. Spray-paint the Manzanita branch(es) pink and let dry thoroughly.
2. Soak the floral foam bricks, then trim them to a size that will fit securely within the vases. Add extra pieces to the vase if necessary to create a tight fit. (There should be a little extra space between the top of the vase and where the foam starts.)
3. Trim decorative paper to the same height as the cube vase, then cover the vase completely, securing with tape or another invisible adhesive. If you’re using 12″ scrapbook sheets, you may need to use 2 strips of paper. Cut a contrasting strip of paper for the top of the vase (approx 1.5” wide), and set it aside for later.
4. Insert the pink Manzanita branch(es) into the foam, making sure they are secure and can easily stand up on their own.
5. Trim rose stems to just a few inches long, and remove all leaves & visible greenery. Insert the roses into the foam, starting along the outer edge of the vase and working your way towards the center. Use remaining roses to fill in any gaps. Make sure that all of the floral foam is covered by roses.
6. Add the 1.5” strip of decorative paper to the top of the vase, positioned so that it covers the top edge of the vase and the bottom of the roses.

7. Tie short pink ribbons all over the branches. Decorate the ends of the skinnier 1/8” ribbons with rhinestones by adhering 2 same-sized rhinestones back-to-back on each ribbon end.
8. Finally, add rhinestone word sticker to the front of the arrangement. You can also use chipboard letters or feature a picture of the guest of honor in place of the rhinestones… personalize it however you wish!
*****
26 Comments
Comments are closed.


fabulous DIY. thanks! Question…if you are using fake roses, what would you use in the vase to hold the branches up?
That is beautiful and sounds easy to make.
I think you can still use the foam. Maybe hot glue gun the roses to the foam so they won’t be coming out.
Hi Tonya –
You could still use floral foam but you’d only need the dry kind… which is even easier! When the foam is tight inside the vase, it keeps things very sturdy – and it will also enable you to have good control over how each of the fake roses sits. Good luck!
Jenn :)
I really love this.
Can I feature this on our blog? We’re having breast cancer awareness week a bit early- this would be great!!
This is amazing and perfect for a Birthday Party or Baby Shower too! What is the treat on a stick over in the lower right corner? It appears to be a marshmallow dipped in something?
Hi Amy –
You can definitely feature this on your blog – I’d actually love that – thanks!
Jenn :)
Thanks Jenn!!
So glad you posted this DIY. Last week when you posted the feather tree DIY, I kid you not I thought to myself, “It would be great if she did a DIY on making a crystal tree.” You heard me!! Thanks! I’m going to try this for Halloween.
Oh, and are those cupcake pops or marshmallows? I love the cupcake pops!
Oh my…. I have lost loved ones to breast cancer and celebrated others beating the disease and I love love love this!!!! This is such a great idea. I did the 3 day last year too. :)
Ebony
OMG – this is to cute. I get so many great ideas coming to your site ;)
Alisha & Angela –
The “pops” are marshmallows dipped in pink “candy melts” (those candy wafers by Wilton that you just melt in the microwave – you can get them at Michaels). Then I sprinkled them with white nonpareils and put a pink m&m on top. Super easy!
I got the idea from Kim of TomKat Studio – who was inspired by Bakerella‘s adorable cake pops. This is the “quick & easy” way to go ;)
There’s actually an entire pink dessert buffet that we did for this shoot – and I’m going to post the DIY on that next :)
So many great ideas! I always love the color-coordinated rock candy.
This looks awesome! Great job :)
Are those chocolate dipped marshmallows? can you give details on how to do those too please. Love all your ideas!
thanks.
oo…this is so pretty..i hv been on a hunt for a pink centerpiece since ages…this one fits beautifully…thanks
I love the idea of changing this up to suit the different seasons & holidays :)
That is awesome.
And on the topic of breast cancer and awareness, I invite you to check out this video — ahamoment.com/pg/moments/view/6789 — about one very special woman’s “aha moment” that led her to walk around the world for the cause. Literally. It’s a wonderful story, and it’s about a lot more than breast cancer. I know you’ll find it extremely inspiring.
Thanks,
jack@ahamoment.com
I lOVE this!! How incredibly creative! We are having a pink Ribbon event and I agreed to donate a centerpiece that will be placed on a table for purchase. Flowers seem to be the running thing. I am worried that this may be a little over the top for some people. Any suggestions about what I can add to this for “purchase” appeal??
I am having a 10 yr. breast cancer survival party and am going to try and make this. I can’t wait! What a wonderful idea to spruce it up!
So I just finished making this tree and tweeked it just a bit…it is now my tree of life….instead of the ribbons just laying flat, I made them in the shape of breast cancer ribbons, 10 of them representing my 10 yrs of survival! Love the idea thanks