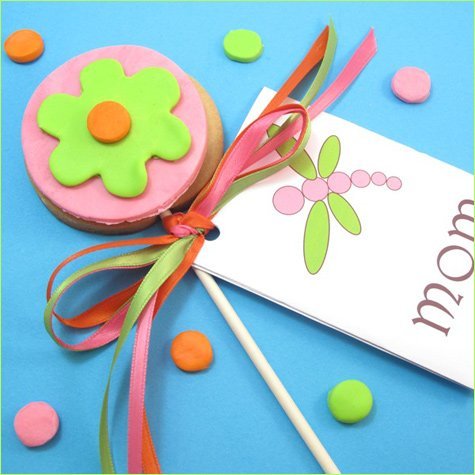
DIY: Adorable Flower Cookie Pops
I’m so excited to share today’s guest post with you! The ultra-crafty & talented Meaghan Mountford – author of The Decorated Cookie and Cookie Sensations: Creative Designs for Every Occasion – is here with a fun DIY cookie project.
Since Mother’s Day is right around the corner, Megan has personalized the downloadable envelope template in this project for Mom, but these cookies would also be great party favor ideas for bridal showers, baby showers & birthday parties! Get all the “how to” info below, as told by Meaghan…


Flower Cookie Pops and Matching Envelope: A Sweet Addition to Any Gift
If you’re like me, you struggle to come up with gift ideas for the mom who has everything and needs no more clutter. Gift cards to her favorite shops, spa gift certificates, coupons for sharing a special day… all lovely ideas. And conventional. But gift cards, spa gift certificates and coupons for sharing a special day accompanied by flower cookie pops…labors of love that will make your gift infinitely more unique.
for the cookies, you will need:
- sugar cookie dough (recipe below)
- frosting (any, even store-bought)
- lollipop sticks
- food coloring (Americolor soft gel pastes: Electric Pink, Orange & Electric Green used here)
- white rolled fondant
- wax paper
- parchment paper
- rolling pin
- light corn syrup
- cellophane bags and matching ribbon
- cookie or fondant cutters (2 ½ inch circle, ½ inch circle, mini flower)

*All of the above can be found at any major craft store and supermarket. Craft stores offer concentrated food colorings, but Americolor soft gel pastes are available at specialty cake decorating stores or on the internet. Find more information at www.americolorcorp.com.
Instructions:
***
STEP ONE: bake your cookies
Roll out your dough thick enough to accommodate the lollipop sticks, about ¼ inch. Cut out a 2 ½ inch circle and place on a baking tray lined with parchment paper. Insert lollipop stick half way into cookie. Bake cookies according to recipe and let cool.
STEP TWO: make your flowers
Take a handful fondant (about 1/3 cup) and add a few drops of Electric Pink coloring. Knead very well until fully blended. Add more drops until desired color is achieved. Repeat with two separate handfuls of fondant using Electric Green coloring and Orange coloring.

Roll pink fondant thinly between two pieces of wax paper. Cut out a 2 ½ inch circle and set aside to stiffen. Repeat with green and orange fondant, cutting out flower shapes and small circles, respectively. Let stiffen about 2 hours.

TIPS: If fondant gets too sticky from over-handling, let sit at room temperature for 15 minutes. If preferred, vary your colors: For example, cut out large orange circles, pink flowers and green small circles.
STEP THREE: assemble your cookies
Dip your finger in light corn syrup and dab on the back of a small fondant circle. Press circle gently on center of flower fondant shape to adhere. Dab corn syrup on back of flower shape and press on center of large circle fondant shape. Spread a thin layer of frosting on cookie, and press fondant flower onto cookie. Let dry overnight and wrap, if desired. Place cellophane bag over cookie and tie at base with ribbon.
TIP: The frosting isn’t necessary. You can adhere the fondant flower to the cookie with corn syrup. But I find frosting to be much yummier.
for the envelopes, you will need:
- color printer
- 8 ½ by 11 inch card stock or photo paper
- scissors, craft knife, craft glue
- hole punch
- gift cards or card stock cut to 2 ¼ by 3 ½ inches
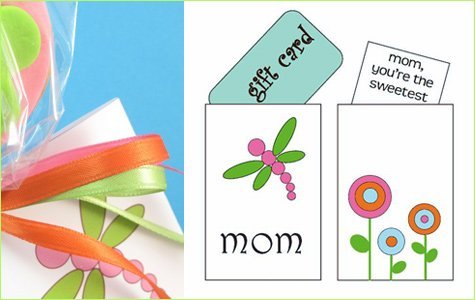
Find the pdf template for your envelopes [here]. Each page will make two envelopes. Cut envelope along outer lines. Carefully and lightly score inside lines using craft knife. Fold along inside lines. Apply craft glue along tabs and hold envelope closed until glue sets. Punch hole through front and back of envelope. When glue is dry, insert gift card or message, and attach envelope to cookies with ribbon.
Ideas: Insert gift cards for a day spa or your mom’s favorite store, or write a message on cardstock and insert in envelope.
*****
Cookie Dough Recipe
- 2 sticks (1 cup) unsalted butter
- 1 cup confectioner’s sugar
- 1 egg
- 1 teaspoon vanilla extract
- 2 ½ cups all-purpose flour
- ½ teaspoon salt
Instructions:
1. With the paddle of a standing mixer or with a hand mixer, cream butter and sugar on medium speed.
2. Add egg and blend well. Add extract and blend. Stir together flour and salt and gradually add to wet mixture.
3. Wrap dough in plastic wrap and refrigerate for one to two hours until chilled.
4. Pat 1/3 of dough into a ball and roll about 3/8 to ¼ inch thick on a floured surface with a floured rolling pin.
5. Cut out shapes and place on a baking tray lined with parchment paper.
6. Bake in a preheated 375 degree oven for 12-14 minutes or until edges are golden brown.
Yields: about 25 to 30 cookies.
Thanks for the inspiration, Meaghan!
9 Comments
Comments are closed.


Very cute! Now I need to make some cookies for my fellow moms for Mother’s Day- if I can squeeze it in between work, hubby and kids.
These are absolutely DARLING! Thanks for the great tutorial!
You had me at Cookie Pops! Yummm, can’t wait to try this . . . .
Hi Jen!
Just wanted to let you know that your website seems to be down! Your blog still works but the website itself doesn’t load. My boyfriend said it’s your web server that you will need to check on.
A friend of mine is hosting a bridal shower from one of your events, so I am hoping to take a look soon!
Good luck!
Hi Lauren – Thanks for your email – the website issue is such a pain! There was some major glitch at the hosting company and they’ve been “working to repair it” all day.
Supposedly most of the affected sites are back up and running – but we still aren’t :( It should be back soon though – at least we know they’re working on it. Please try checking back later tonight or tomorrow.
Thanks!
Jenn
I cannot wait to try these!! SO SWEET!!! They are perfect for an upcoming housewarming I am throwing. THANK YOU!!
These are adorable! Can not wait to make them for my mom and will make and give as favors at an upcoming baby shower! Thanks for the great idea!
I think these are great…so versatile for ANY occasion. It seems to me that anything tucked into a little cello bag; plain or printed; truly creates the finishing touch and helps keep things fresh too. A helpful cello wrap tip: cinch your bag around the stick with an little rubberband or a twist tie (a twist tie is my preference) before adding your ribbon on top of it. It makes it so much easier and secures the bag down nicely. I must agree, the frosting definatley makes it all the yummier.
I made your cookies and they are very delicious
Thank you!!