DIY Halloween Balloons with “Floating Heads”

My newest tutorial for Balloon Time is ready for you – and it’s a FUN one! 👻 Don’t be spooked by the “floating heads” description either. These characters are actually really cute + simple to create using printables, a marker, and a little craft paint for the vampire’s “hair”. 😜
Scroll to the bottom of this post for the Free Printables & DIY Instructions.


“FLOATING HEAD” HALLOWEEN FRIENDS
***
Materials:
- Silver, White, and Green Balloons
- Balloon Time Helium Tank
- Halloween Friends Printables
- Plain Paper (for printable face elements)*
- Card Stock (for printable bodies)
- Scissors
- Glue Stick
- Tape
- Black Permanent Marker
- Black Paint & Paint Brush
- Fishing Wire
*Tip: It’s important to use the lightest weight paper possible for the face elements so that they don’t add too much weight to the balloons.
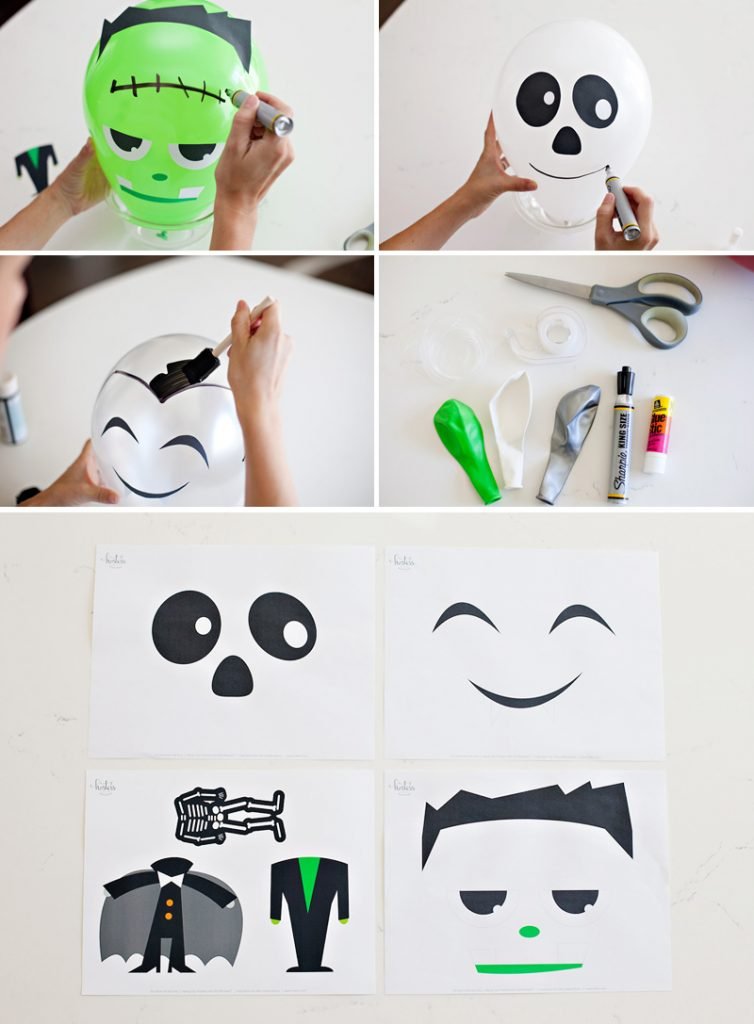
Frankenstein Instructions:
1. Cut out the printable Frankenstein face elements and body.
2. Fill a green balloon using your Balloon Time Helium Tank.
3. Tape the balloon into a bowl to keep it from floating away.
4. Use a glue stick to attach the hair, eyes, nose, and mouth to the balloon.
5. Draw a “stitch” across the forehead with a black marker.
6. Tie a fishing wire string to the balloon. Use tape to attach Frankenstein’s body to the string, a couple of inches away from the balloon face.
Skeleton Instructions:
1. Cut out the printable Skeleton face elements and body.
2. Fill a white balloon using your Balloon Time Helium Tank.
3. Tape the balloon into a bowl to keep it from floating away.
4. Use a glue stick to attach the eyes and nose to the balloon.
5. Draw a “stitched mouth” on the balloon with a black marker.
6. Tie a fishing wire string to the balloon. Use tape to attach the Skeleton’s body to the string, a couple of inches away from the balloon face.
Vampire Instructions:
1. Cut out the printable Vampire face elements and body.
2. Fill a silver balloon using your Balloon Time Helium Tank.
3. Tape the balloon into a bowl to keep it from floating away.
4. Use a glue stick to attach the eyes and nose to the balloon.
5. Use a black marker to draw the outline of a widow’s peak hairline above the eyes.
6. Fill the widow’s peak hairline with black craft paint. Let dry for 15 minutes.
7. Tie a fishing wire string to the balloon. Use tape to attach the Vampire’s body to the string, a couple of inches away from the face.
Hope you have some fun with these guys! Which one is your favorite? Happy Halloween!
11 Comments
Comments are closed.


DIY Halloween Balloons with “Floating Heads”: Hostess with the Mostess®
My newest tutorial for Balloon Time … https://t.co/gJjvkZ3v1R
DIY Halloween Balloons with “Floating Heads” https://t.co/9EjSz1Kjsa
DIY Halloween Balloons with “Floating Heads”: Hostess with the Mostess®
My newest tutorial for Balloon Time … https://t.co/GRgeieWw6s
DIY Halloween Balloons with “Floating Heads” https://t.co/bSmoxgPswG
DIY Halloween Balloons with “Floating Heads” https://t.co/FSYRkoBYDI
what a great idea … provides big visual impact and doesn’t break the bank.
Thanks, Lindsay! :)
DIY Halloween Balloons with “Floating Heads” https://t.co/9EjSz1Kjsa
Very very creative! These Halloween balloons are looking so amazing.
I always wanted to do my parties at home, now I am doing this, I contract catering service and I command bullet, yes, I will indicate this post I loved the balloons.
What a fantastic, creative idea! Love it! Any Halloween party would be complete with these. Add some more Halloween decor, ambient lighting, creepy music and maybe a smoke machine, and you have a superb foundation for a Halloween-themed party. Thanks for sharing this project!