Ghoulish Glam Halloween – Part 2 {Tablescape}

Well, it’s Thursday morning… and I can’t believe I’m saying this already but the Hip Hostess Halloween event is TONIGHT! We started setting up yesterday, and I have to say that venue (The Apartment) is just as amazing in person as it looks online…there’s even a walk-in “cooler bar” where we’ll be serving up a special drink!
Before we head out to finish setting up, I wanted to share some Ghoulish Glam tablescape tips for those of you planning to host Halloween dinner parties next week. Everything here is super easy to create – it’s all about layering and a few spooky-yet-sparkly details. Here goes…
GHOULISH GLAM HALLOWEEN- Topic #2: The Tablescape
In keeping with the flapper era-inspired foundation of this Halloween party theme, the focus of the tablescape design is vintage-inspired elements with shimmery spider & skull details, and the color palette is primarily black & silver with splashes of white and vibrant orange.
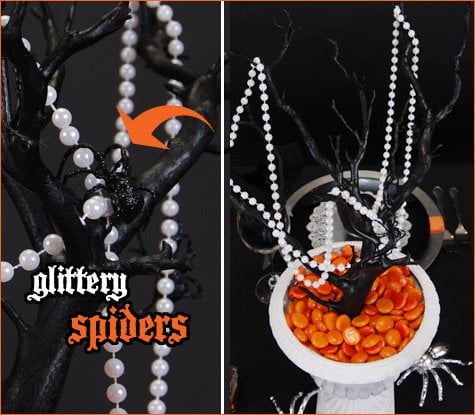
- The table centerpiece features spray-painted Sierra Manzanita ($6.99 at save-on-crafts.com), flapper costume beads, and glittery spiders. (Scroll down to the bottom of this post for step-by-step “how-to” details.) Fill the table space around the centerpiece with vintage or gothic-themed Christmas ornaments and votive holders embellished with black & orange ribbon.

- Dress up wine glasses with “skull stem charms” made from plastic skull rings and adhesive rhinestones, and Halloween-themed stickers like Martha Stewart’s “Beware” labels pictured here.
- For place settings, you’ll need silver charger plates ($12.60 for 6 at save-on-crafts.com), black dinner plates, 8″ silver foil cake liners, ribbon, and foam skulls.Wrap a band of orange ribbon around the charger plate for a small pop of color, then layer the rest of the elements on top. I created the shimmery black skulls pictured here using unfinished foam skulls from Michael’s ($1.49 each), black spray paint, and black craft glitter.
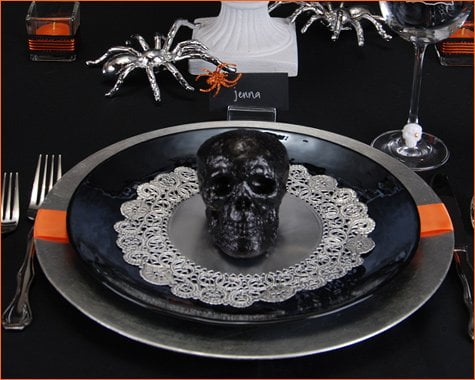
- Embellish place cards with glittery orange spiders, created by snipping the “ring” portion off of orange plastic spider rings, then decorating the spider portion with orange craft glitter. Also pictured below: Clear Placecard Holders and Black Placecards from *Social Couture.

• These fabulous silver spiders (below) are currently on sale at Z Gallerie stores, and I couldn’t resist snapping up a bunch of them! You can also create your own using plastic toy spiders, a gray primer paint, and metallic silver spray paint…

Here’s a shot of the entire tablescape…click on the image to view it at a larger size. For tonight’s party, we’ll be setting this up on a white lacquer table instead of a black tablecloth, so I’ll post some shots of that version later!

Okay… I’m off to start the day… looking forward to meeting some of you at the party tonight! Here are those centerpiece instructions too…

GHOULISH GLAM CENTERPIECE:
***
You’ll Need:
- small container shaped like an urn
- small manzanita branch
- orange vase gems
- white costume beads
- glitter spiders
- black and white spray paint
Directions:
1. Paint the urn glossy white (usually requires 2-3 coats) and the manzanita branch black, and let dry.
2. Fill the painted urn with vase gems and insert the branch into the container. (If you feel like the branch needs extra support to stay up, you can also insert the branch into floral foam first and then cover the foam with the vase gems.)
3. Drape a strand of white costume beads around the branch, and finish with a few glittery black spiders crawling on the branches and beads. The spiders pictured here are from Z Gallerie, but you can also create your own using any type of plastic or toy spider, black spray paint, and black glitter!
*Get 10% off any Social Couture order with promo code “HWTM “!
13 Comments
Comments are closed.


Another perfect table. Wish I was at the Hip Hostess Event tonight
Can’t wait for tonight!
This table is so freaking cool! I love the foil cake liners idea – and the silver skulls are fantastic!
Everything looks fantastic, Jenn! Good luck tonight!
L-O-V-E it! i love the use of the manzanita branch. can’t halloween be everyday?! ;) have fun tonight!
This is seriously awesome.
Hi Jennifer! I just came back from your Dallas party at the Apartment and I have to say – the decor was hip and beautiful, the party was very organized, everything was amazing and I absolutely loved it! We’d love to have you back here in Dallas in the future so please come back! :)
Hi Jenn! It was great meeting you last night! My friends and I had a blast! They are all sold and went to check out the blog today :) I have more questions so feel free to email me: kanne84@gmail.com!
Kendall
Thanks, Jessica & Kendall! I’m so glad you had a great time at the party! We’d love to come back – hopefully we can make it happen! :)
I love this idea! I decided to be a flapper for this Halloween so this party theme would work best with my outfit!
this sounds awesome! to bad i cant get the stuff.
Such a great-looking, adult-appropriate Halloween spread – thanks for sharing :)