Marbled Baby Shower Balloon Weights + Centerpiece

I’m totally smitten with the marbled trend that’s popping up all over these days – from marbled balloons & mugs to paper plates & napkins! I felt inspired to use this look as a fun spin on baby shower decor.
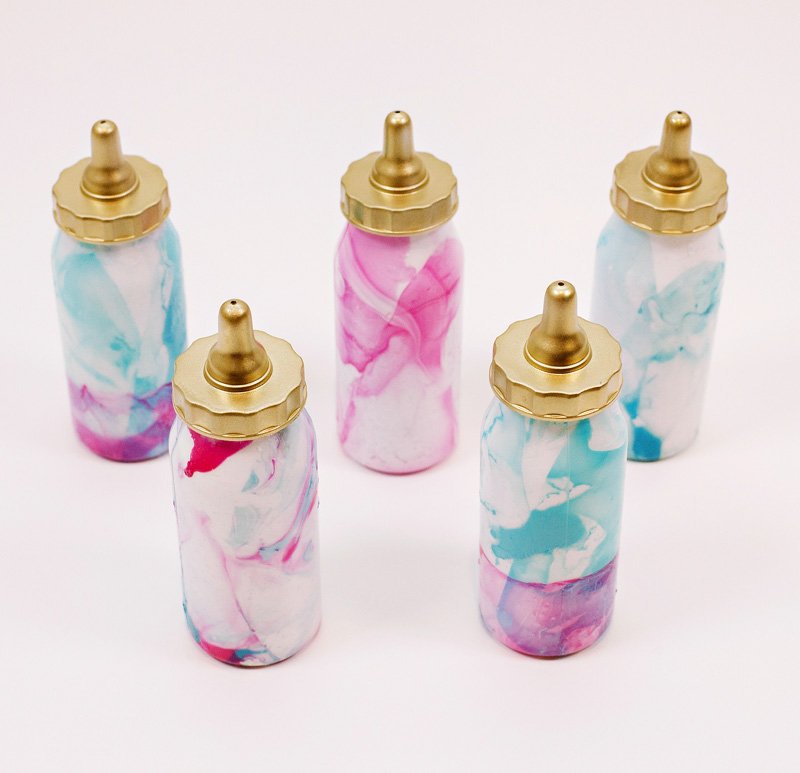
So… what I have for you today is a fun Marbled Baby Shower Balloon Weights project that coordinates perfectly with store-bought marbled balloons.
This combo looks super cute lined up in groups of 3-5 as a high-impact (and low-cost!) party table centerpiece, but you can also use them individually as playful decor anywhere your baby shower needs a fun *POP*. 😉
The baby bottles used here are plastic favor containers, which are inexpensive. You’ll also want to go the inexpensive route on your nail polish and craft paint here since these materials get used up quickly. Let’s just say that dollar bins are your friend with this project!
This concept is super versatile, too, so feel free to mix things up with your own favorite color palette.

MARBLED BABY SHOWER BALLOON WEIGHTS + CENTERPIECE
***
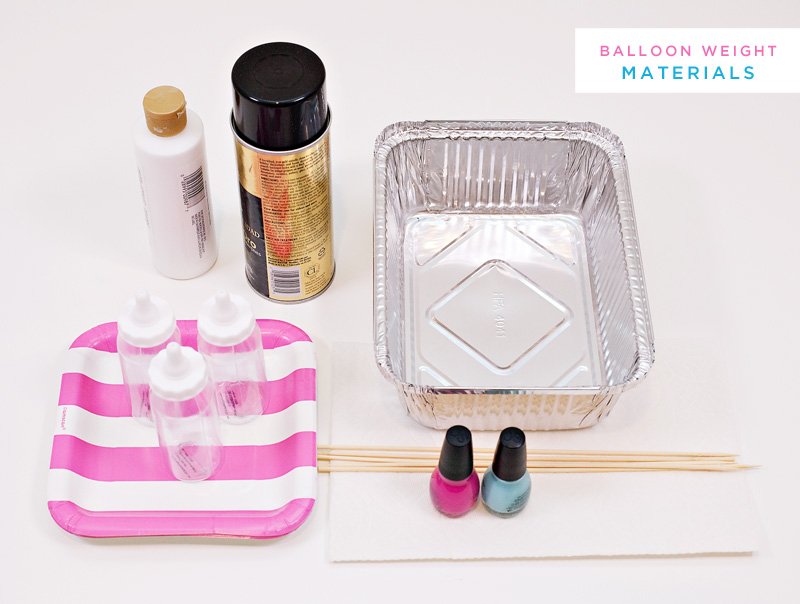
Materials:
- baby bottle favor containers
- white acrylic craft paint
- gold spray paint
- nail polish
- disposable tin
- bamboo skewers
- paper towels & paper plates
- nail polish remover + cotton pads (not pictured)
- dry rice or sand for “filler” weight (not pictured)
Instructions:
Note – do Step 1 the day before marbling the outside of the bottles, if possible, to allow for drying time.
1. Remove the plastic tops from the baby bottles, and pour a generous amount of white craft paint into each bottle (about 1/6 full). Turn the bottle nearly upside down, at an angle, and let the paint drip down the walls of the bottle. Roll the bottle around with your fingers to help the paint along. When the paint is about halfway down, set the bottle upside down on a paper plate and let the rest of it drip down on its own. Repeat with the remaining bottles.

Tip: A ton of excess paint will drip out from the bottles. Let the paint drip for about 20 mins, then lift the bottles up and move them to another plate to continue dripping. Fold the original paper plate in half and use it as a funnel to pour the excess paint back into the paint bottle to save it! After the 2nd round of dripping, flip the bottles right side up and let them air dry for 8 hours (or preferably up to 24 hours if you’ve got time to spare!).
2. Spray paint the bottle tops gold and set them aside.
3. Once the insides of your bottles are dry, you’re ready to marble the outside! Fill your disposable tin with a few inches of warm water and set a few paper towels down next to it (that your bottles can sit on top of to dry).
Working VERY QUICKLY, pour a few drops of nail polish into the water, then swirl it around for a couple of seconds with a bamboo skewer, as shown below. Immediately dip your baby bottle into the nail polish water, dunking one side at a slight angle, then rolling & dunking it until the entire bottle is covered. (I did three dunks for these bottles.)

Note: The nail polish will set in the water within about 10-20 seconds, so I can’t stress enough how important it is to work quickly! Don’t overthink it; just drip, swirl, and dunk. Then repeat! The patterns will all be different, and the messier, the prettier with this project. You’ll probably get nail polish all over your fingers, too… which is where the nail polish remover comes in handy. ;)
Also – because the nail polish sets so quickly, you’ll need to change your water out each time you marble a bottle, regardless of whether the color changes, so working close to a sink is helpful. No need to change the pan out, though – you can use the same disposable pan for every color.
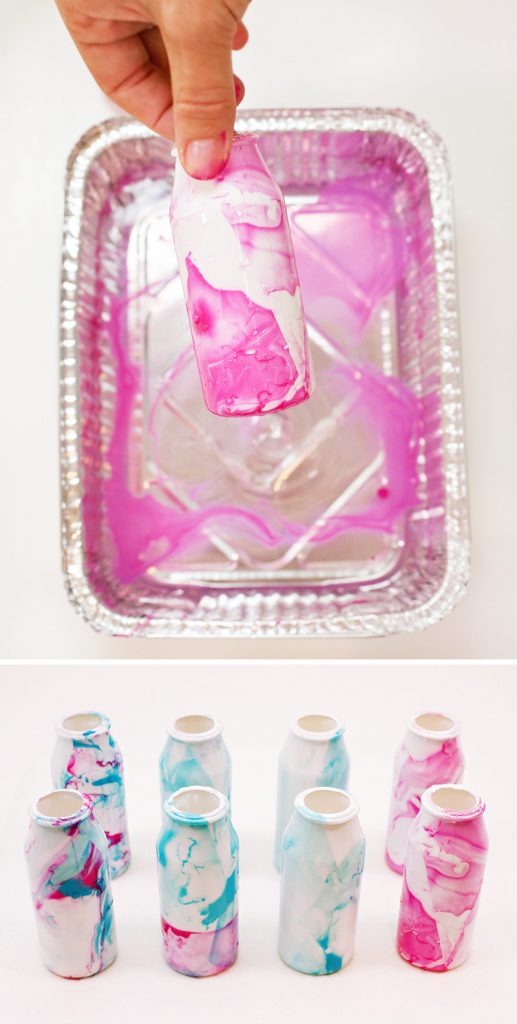
Marble as many baby bottles as you need, then let them dry for 15 minutes. Once dry, fill them with dry rice or sand to help weight them.
If you want to put more than one color on a bottle, you can simply drip multiple colors of nail polish into the water at once (as seen on the far left bottles of the image above), OR you can marble one color, let it dry for 5 minutes, then marble a 2nd color. This latter method gives more of a two-tone or “double-dipped” look.
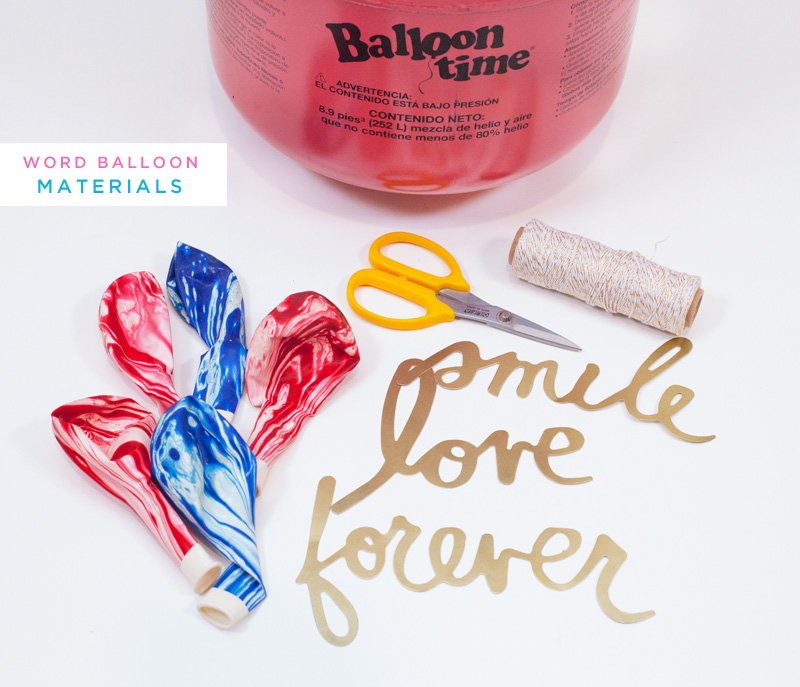
Next up, we need some balloons to tie to our cute balloon weights! And what could be more fitting for marbled balloon weights than marbled balloons, right?! ;) I purchased pink and blue marbled balloons at Michaels, then used my Balloon Time Helium Tank to fill them up.

I also added some paper words to these balloons for a sweet touch. I used these jumbo die-cut words by Heidi Swap and spray-painted them gold. (They arrive black because they’re intended for use with a foil-cutting machine.)
You can also use letter stickers to spell out your own words or cut custom words from a craft-cutting machine if you have one. Using pre-cut paper words kept things easy here, though! Use a glue stick or spray adhesive on the back to mount them to the balloons.

The baby bottle favor containers have a handy-dandy hole in the lid that works nicely for attaching the balloons to the bottles! Just pull the string through the hole in the lid, then tape the string to the inside of the lid before placing it back on the bottle.
If your string is too thick, you can simply tie the balloon strings to the neck of the baby bottle.

*****
Disclosure: This post is sponsored by Balloon Time. As always, all thoughts and designs are my own. Thank you so much for supporting the companies that make it possible for me to keep the creative content coming your way!
5 Comments
Comments are closed.


Marbled Baby Shower Balloon Weights + Centerpiece: Hostess with the Mostess®
I’m totally smitten with the ma… https://t.co/pez765RHcw
This is unique and not to difficult to pull off. Thanks for an original idea!!
Lovely idea!
Can it be used for anything else, other than a weight?
Sure! These would just make for cute baby shower decorations in general. You could just use them as-is a accents to a baby shower centerpiece (floral or otherwise) or add little flag toppers to them like I did here. (The same favor bottles are used but they aren’t marbled.)