DIY Tutorial: Clever Dinosaur Serving Dish!

So… I have a major crush on this super fun & oh-so-clever project by Gretchen of Three Little Monkeys Studio!
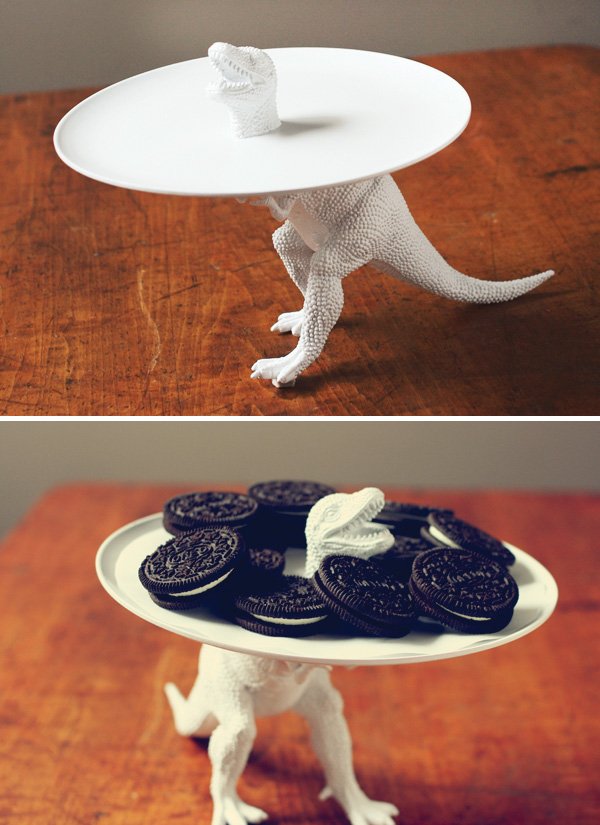
Her playful DIY Dinosaur Serving Dish is simple to make – you just need a little patience to allow for curing time. It’s affordable too! You can upcycle old toys and melamine plates, or pick up items from your local Dollar Store or thrift store.
This concept can easily be applied to other playful critters too… think bunnies for Easter, owls or black cats for Halloween, and reindeer for Christmas. Read on for step-by-step details!

Dinosaur Party Printables
Planning a dinosaur party? Check out my Dinosaur printables. They make it so EASY to add pro designer style & personalization to your event. It’s like branding for your party! 🙌 Click here to shop now.

DIY DINOSAUR SERVING DISH
by Gretchen
Takes 2-3 days with curing time
Materials
- hard plastic dinosaur (it needs to be sturdy and balanced)
- small melamine plate
- sandpaper
- adhesive*
- spray paint
- handheld saw
- parchment paper

Step by Step Instructions
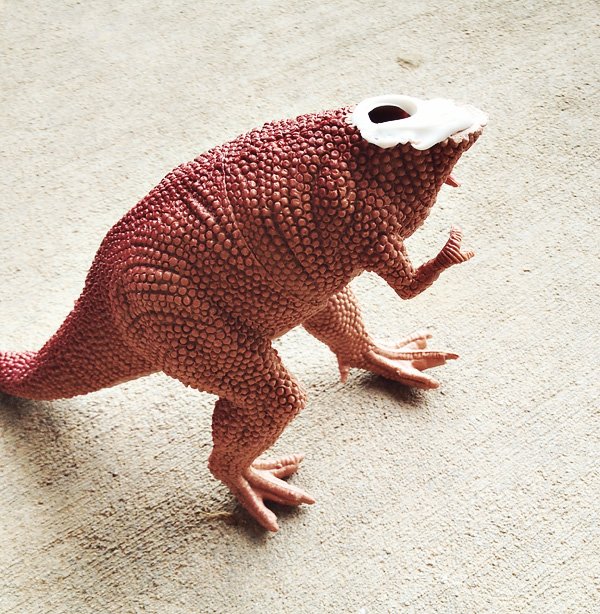
1. Use the handsaw to cut off your dinosaur’s head just above the shoulders. Make a level cut. Use sandpaper to smooth the edges (it will be rough).
2. Lightly sand the surface of the plate on the bottom and top where you will be adhering it to the dinosaur. No need to sand the entire surface.
3. Apply your adhesive to the body of the dinosaur and plate. My adhesive* recommends applying to both items you want to glue together, and allow them to set for 5-10 minutes BEFORE adhering.
4. When ready, attach the plate to the body. Touch-ups can be done around the glue site with a damp paper towel. Allow to cure for 24 hours.
5. Once the body and plate have dried and cured, prep the dinosaur’s head and attach to the plate. You’ll need to eyeball it from the side and front before attaching to make sure it’s centered in the right spot. Perform any touch-ups and allow to cure for 24 hours.
6. Once completely dried, spray paint from all angles and underneath. I like to spray one coat at a time every 20 minutes or so to avoid drips and get the best coverage.
7. Once your dinosaur is dry, enjoy**!
* I used Loctite Stik’N Seal.
** Please note that food should NOT come into contact with paint. Line the plate with parchment paper and cut to fit.
You can find more of Gretchen’s adorable DIYs on her blog, as well as custom printables at Three Little Monkeys Studio.
Dinosaur Girl Party Printables
Planning a dinosaur party? Check out my Dinosaur Girl printables! They make it so EASY to add pro designer style and personalization to your event. It’s like branding for your party! 🙌Click here to shop now.

30 Comments
Comments are closed.


Rawr-some! (I’m cheesy. Sorry) RT @Wedding_Agent: DIY Tutorial: Clever Dinosaur Serving Dish! https://www.hwtm.com/2013/11/diy-dinosaur-serving-dish/ #weddings
I’d love to know where you found your dinosaur
I'd love to know where you found the dinosaur.
“DIY Tutorial: Clever Dinosaur Serving Dish! // Hostess with the Mostess https://www.hwtm.com/2013/11/diy-dinosaur-serving-dish/” Must. Make. This.
great idea:) i love it!
cute it is!!!!
DIY Tutorial: Clever Dinosaur Serving Dish! // Hostess with the Mostess https://www.hwtm.com/2013/11/diy-dinosaur-serving-dish/ via @zite
Yes!! Rt@Dalidoll85: @Nerdyplatypus hehehe, I think you need this to go with your s&p shakers :) https://www.hwtm.com/2013/11/diy-dinosaur-serving-dish/
Cute! If your plate was already white, you could spray paint the dino halves before gluing and not worry about putting food on a painted plate.
why not leave the dinosaur brown or whatever color it is to add to the delight of the whole idea?
Quiet random, but I like the idea, I guess it’s perfect for kids parties and this kind of stuff.
I tried my hand at it, and am quite pleased with the results: http://myfavoriteings.com/2014/02/24/pinterest-victory-the-dinosaur-plate/. Thanks for the amazing idea!
I tried my hand at it, and am quite pleased with the results: http://allisonkpark.wordpress.com/2014/02/24/pinterest-victory-the-dinosaur-plate/. Thanks for the amazing idea!
Spray paint the dinosaur first not last…
They have tons at science and surplus stores or learning/hobby stores.
These are so cool! I love how they look spray painted.
Cool idea! love it
..and I would use a water based acrylic paint + water based sealer and a food safe, non painted plate. That spray paint is going to offgass for a long time. not something you would want in your kitchen etc, but most of all, you wouldnt want food near or on it, even with the parchment paper.