How to Make Your Own {Creative} Custom Party Plates

I’m excited to share one of my VERY. FAVORITE. “party tricks” with you today! You can make such a big impact to table place settings or food/dessert buffets with these DIY Custom Party Plates. All you need is decorative papers or stylish gift wrap + spray adhesive to transform clear plastic plates into unique decor that perfectly matches your party! And worth noting: I tried several different types of adhesive the first time I made these and a light coat of spray adhesive was the best and most streak-free solution by far.
Sure – this takes a little extra “crafty” time and might not be ideal for your 200+ person affairs, but for smaller celebrations like baby showers, milestone birthdays, and celebratory dinner parties, this is such a great way to make a BIG creative splash. You can also add a thoughtful touch by incorporating names or photos of the guest(s) of honor into the plate designs. :)
Read on for the instructions + a few examples of how I’ve used this project at events in the past.

DIY TUTORIAL – CUSTOM PARTY PLATES
***
You’ll Need:
- Clear Plastic Plates (I buy mine at Party City)
- Spray Adhesive
- Decorative Paper
- Paper Cutter
- Optional: Photos (photo copies or home print-outs are fine)
Instructions for Simple Decorative Plates:
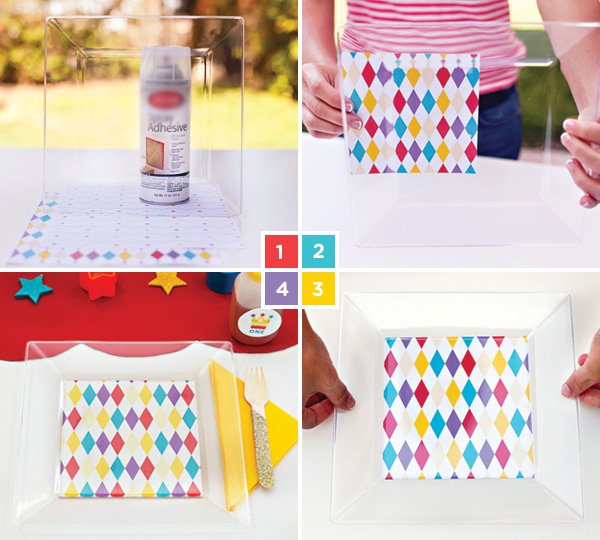
1. Gather your materials and set up an outdoor workspace. Spread out a large plastic trash bag on the ground next to your workspace to act as your “spray” area. (You can also use a large cardboard box.)
2. Cut decorative paper to size for the bottom of your plates. My papers measured a little under 6” square here.
3. Spray the top surface of each decorative paper square with a light, even layer of adhesive, then set it down on top of your workspace, sticky side up. Hold a clear plastic plate directly over the paper, centering the plate as best you can before it touches the paper (doesn’t have to be perfect), then press down firmly to secure the bottom of the plate to the surface of the paper.
4. And you’re done! You’ve got a pretty, unique plate that perfectly coordinates with the rest of your party decor. Repeat the process to make as many plates as you’d like.
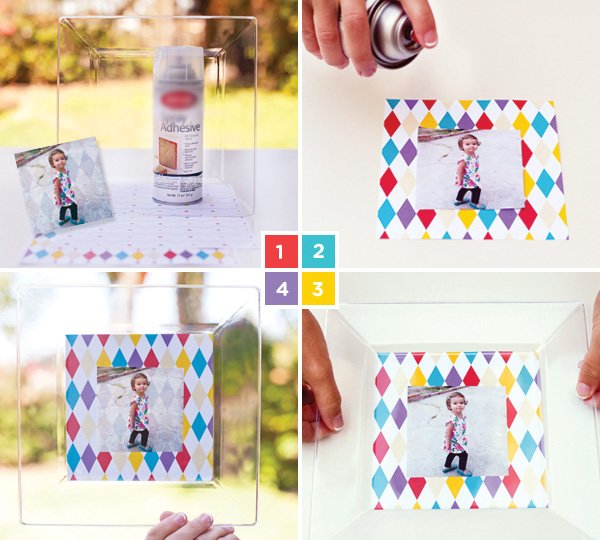
Instructions for Photo Plates:
To create personalized photo plates, use the exact same steps as above, except layer a smaller photo on top of your patterned paper square, as shown here. Use as many different photos as you like to create a thoughtful, personalized table filled with your favorite memories!

In-Use Examples
Want to see a few examples of these custom plates in use? Click on a title to view the full party:
Pictured Above: Toy-Inspired Royal First Birthday Bash
Pictured Below: 1. Dancing with the Stars Viewing Party (I used a different shape of plastic plate here.) | 2. Swim Party Play Date | 3. About to Pop Baby Shower (I alternated between spray adhesive and washi tape for the plate adhesive here.)

*****
10 Comments
Comments are closed.


How to Make Your Own {Creative} Custom Party Plates #catering #wedding http://t.co/sXiy23JTG2
How to Make Your Own {Creative} Custom Party Plates http://t.co/ixShj1vfVN
Is This food safe ?
Yep! The paper is on the bottom surface of the plate – not the top, so nothing is affected at all where the food actually goes. :) That’s why it’s necessary to use a clear plate, though.
This is just for once-off right? Plates can’t be washed due to paper being used….
Correct – these would be intended for one time use. :)
Love this idea for How To Make Your Own Custom Party Plates https://www.hwtm.com/2014/10/diy-tutorial-custom-party-plates/ via @HWTM_Jenn
Fun idea! “How to Make Your Own {Creative} Custom Party Plates” https://www.hwtm.com/2014/10/diy-tutorial-custom-party-plates/
Great tip for creating custom party plates https://www.hwtm.com/2014/10/diy-tutorial-custom-party-plates/ via @HWTM_Jenn – An awesome, easy personal touch!